

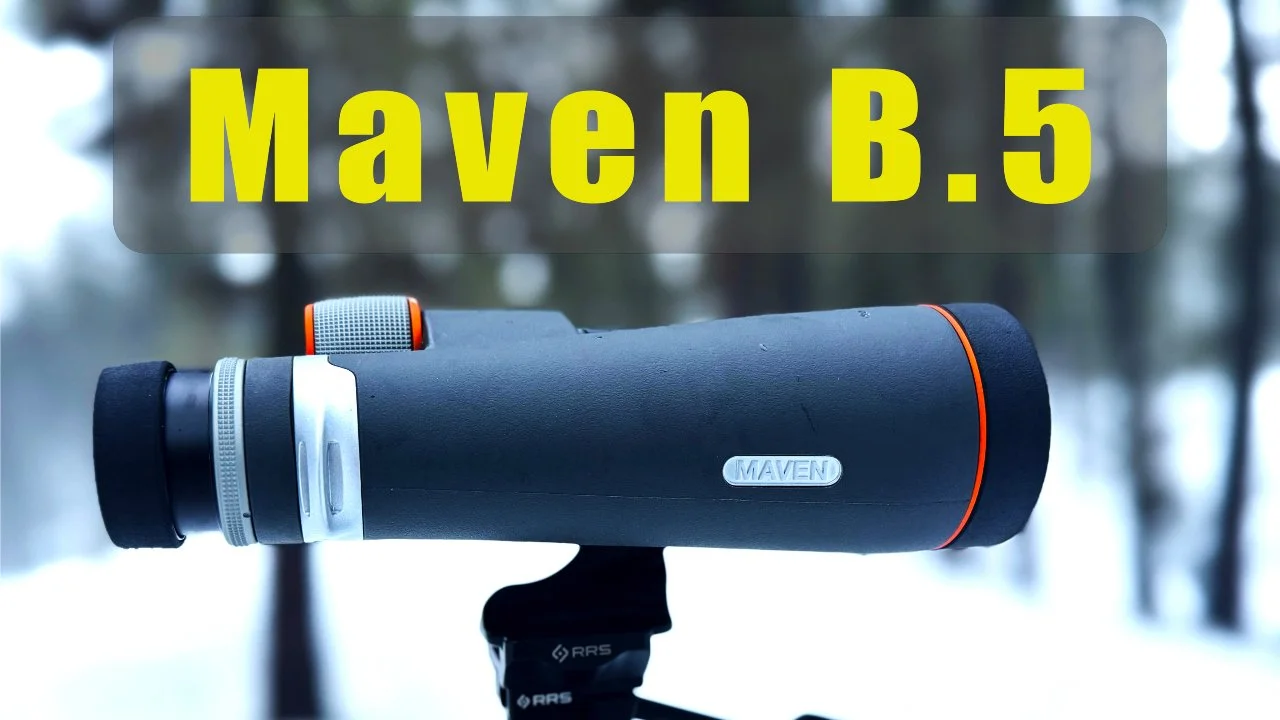
MAVEN B5 18x56 Review
Hey everyone, welcome back to Ignited by Nature. Today, I’ve got something special for those of you looking to step up your glassing game. I’m diving deep into the Maven B.5 18x56mm premium binoculars, a powerhouse tool designed to deliver unmatched clarity and detail for those critical low-light moments."
The Maven B.5 is built on the award-winning B.2 platform but brings some key upgrades to the table. It features a lightweight magnesium frame, an Abbe-Koenig prism system, and the same fluorite glass found in Maven's top-tier S Series Spotting Scopes. It’s designed for those long days glassing big, open country where details matter, especially during early morning or late evening hours."
One of the standout features of the B.5 is its exceptional viewing performance. At 18x magnification, this model excels at long-range viewing, making it perfect for spotting game at a distance when every detail counts. Thanks to the fluorite glass, you’re getting sharper images, better color fidelity, and enhanced contrast, even as the light fades."
B.5 Specifications
18x magnification
56mm objective lens
Exit pupil: 3.1mm
Field of View (FOV): 194 ft @ 1000 yds
Twilight factor: 31.7
Light transmission: 92.7%
Eye relief: 18mm
Weight: 45 oz
Magnesium frame, Fluorite Glass, Abbe-Koenig prism
With an exit pupil of 3.1 mm and a field of view of 194 feet at 1000 yards, the B.5 offers tack-sharp edge-to-edge clarity. Combine that with 92.7% light transmission, and you're left with a binocular that performs well in challenging lighting conditions—perfect for big-game hunters and wildlife enthusiasts.
Maven’s silky focus mechanism is another standout. Whether you're adjusting for close targets at 9.8 feet or spotting something way out in the distance, the focus wheel is buttery smooth and precise, making those quick adjustments seamless.
The build quality here is impressive. The lightweight magnesium frame keeps the binoculars at just 45 ounces, and the Abbe-Koenig prism design improves light transmission, delivering brighter images. The rugged design is waterproof and fog-proof, rated IPX7 for up to 30 minutes submerged at 1 meter. It’s tough enough for any conditions you'll encounter in the field.
PROS
Outstanding low-light performance: With 92.7% light transmission and a large 56mm objective lens, the B.5 is perfect for low-light glassing.
Fluorite glass: Provides superior clarity, color fidelity, and contrast, making it a step above typical ED glass.
High magnification (18x): Allows for detailed, long-range glassing without the need for a bulky spotting scope.
Rugged build: Waterproof, fog-proof, and durable thanks to the magnesium frame and IPX7 rating.
Smooth focus mechanism: Easy and precise adjustments, even at high magnifications.
Direct-to-consumer pricing: Premium optics at a fraction of the cost compared to other high-end brands.
CONS
Heavy: At 45 oz, these binoculars can feel a bit bulky during extended use, especially for those on the move.
Narrower field of view: The 18x magnification offers a field of view of 194 ft at 1000 yards, which is narrower than lower-magnification models.
Requires a steady hand or tripod: At 18x magnification, any hand shake is magnified, making a tripod almost essential for long glassing sessions.
While the Maven B.5 brings incredible optical power, the 45-ounce weight and high magnification might be a bit much for handheld use, especially over long periods. However, if you're looking to avoid carrying a spotting scope and still want top-tier magnification, these binoculars are a solid choice.
Maven includes some thoughtful accessories too—like the neoprene neck strap, lens caps, and a double-layered microfiber storage bag, ensuring you’re always prepared and protected in the field.
Highlights of key features
18x magnification for long-range glassing
Fluorite glass for superior clarity
Abbe-Koenig prism for brighter images
Edge-to-edge clarity and excellent color fidelity
Waterproof and fog-proof design (IPX7)
Tripod adaptable for added stability
Whether you’re glassing for elk across a valley or trying to pick out details during that golden hour, the B.5 delivers outstanding performance. The edge-to-edge clarity ensures you aren’t missing a thing, and the premium fluorite glass ensures that every detail is sharp and vibrant."
Maven’s B.5 series brings high-end performance at a fraction of the cost of comparable binoculars on the market. You’re getting the same level of performance as optics twice the price, thanks to Maven’s direct-to-consumer model that cuts out the retail markup. Plus, it’s backed by their lifetime warranty, so you know you’re covered.
If you're looking to step up your glassing game with a binocular that delivers serious magnification and unrivaled clarity, the Maven B.5 18x56mm is an incredible choice. Thanks for tuning in to Ignited by Nature. Make sure to like, subscribe, and drop your questions in the comments. And as always, stay ignited by nature.
FINAL THOUGHTS
In summary, the Maven B.5 18x56mm binoculars are a powerhouse for those who need top-tier clarity, exceptional low-light performance, and long-range glassing capability. They offer a perfect solution when you want the benefits of a spotting scope but prefer the versatility of binoculars.
If you’re looking for premium binoculars that can handle a wide variety of outdoor activities—from hunting to birdwatching—while providing excellent durability and optical performance, these should be on your radar.
[CLOSING STATEMENT]
Thanks for reading and remember to stay connected to the wild! If you found this review helpful, subscribe to my email list for more updates on outdoor gear reviews and adventures.
You can also follow me on any of the woke media outlets—I mean, social media platforms—if you haven’t already. Also, leave a comment below if you want to share your thoughts or tell me what binoculars you’re using.
Once again, I’m Chris with Ignited by Nature. Until next time, guys and gals!
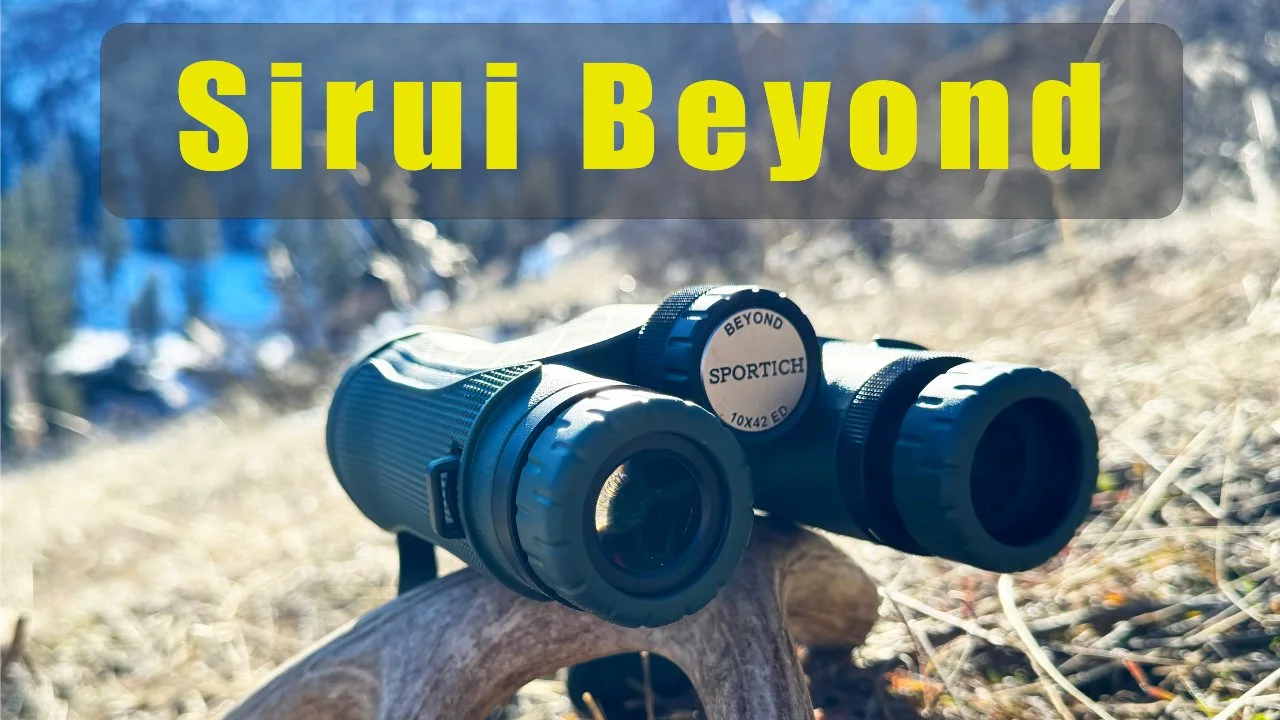
SIRUI Beyond B1042A Binoculars Review – Are These the Best Budget Binoculars?
🎯 In this review, I'll cover: First impressions Build quality and design Optical performance in real-world tests Key specs & features (10x magnification, BAK4 prisms, waterproofing, and more) Pros and cons Whether they're worth the price at $199! If you’re looking for an affordable binocular option that doesn’t compromise on performance, stick around for the full breakdown! If you enjoyed the video, don’t forget to hit that like button and subscribe for more gear reviews! Let me know in the comments what binoculars you’re currently using, or if you have any questions about the SIRUI Beyond B1042A! Thanks for watching and remember to stay connected to the wild! 🌲🔥
Hey there guys and gals, this is Chris with Ignited by Nature, and welcome back to my Blog! Today, I’m diving into the SIRUI Beyond B1042A Binoculars, an affordable pair of optics designed for observation. Whether you’re birdwatching, hunting, or just enjoying the great outdoors, these binoculars offer some exciting features for under $200. Let’s break them down and see how they perform in the field.
[Overview]
The SIRUI Beyond B1042A Binoculars offer 10x magnification, which sits comfortably in the 'golden range' of binoculars for hunters which I think that is their main target audience for these binoculars. Although I am more of a fan of 8’s, the 10’s do strike a nice balance between zoom power and image stability for most. With a 42mm objective lens, these binoculars provide all the traditional qualities of a 42 mm objective lens which includes bright, clear images even in low light, making them perfect for dawn and dusk observation. They also feature a 20mm large eyepiece for a more comfortable viewing experience, ensuring you can see all the details without straining your eyes. Ok so now that we have done a high level overview, lets dive into some key features.
[KEY FEATURES]
10x Magnification and 42mm Objective Lens
The 10x42 configuration strikes the perfect balance between magnification and portability. The 42mm objective lens ensures more light comes in, giving you bright, clear images even in low-light conditions. It’s compact size paired with a 42 mm objective lens is perfect for bird watching, landscape viewing, or wildlife observation.
20mm Large Eyepiece
SIRUI has equipped these binoculars with a 20mm large eyepiece, which provides a much better viewing experience. The larger size enhances brightness, color accuracy, and detail, making the image much clearer compared to smaller eyepieces.
BAK4 Prism
The BAK4 prisms are known for their superior light transmission and image clarity, ensuring the images you see are sharp and free from distortions, especially in low-light situations.
Multi-layer Coating & Waterproofing
The multi-layer coating on the lenses boosts light transmission up to 88.5%, providing vivid, high-contrast images. Additionally, these binoculars are IPX7 waterproof and nitrogen-filled, meaning they are fog-proof and fully reliable in harsh outdoor conditions like rain or snow.
Compact and Lightweight
Weighing in at just 1.16 lbs (525g), the SIRUI Beyond B1042A is easy to carry on long hikes or treks. The compact design makes it an ideal companion for anyone needing portable optics.
Warranty
Like most other companies these days Sirui offers a limited lifetime warranty which means they will cover the optic against manufacture defects, but they will not cover the product if you damage it yourself. In fact, it specifically says that you will have to pay for repairs if the damaged is caused by you.
SPECS SECTION
Let’s take a moment to dive into the specific technical details of the SIRUI Beyond B1042A Binoculars:
Magnification: 10x
Objective Lens Diameter: 42mm
Eyepiece Diameter: 20mm
Field of View: 314.4 ft @ 1000 yds / 104.8m @ 1000m
Minimum Focus Distance: 3m
Exit Pupil Diameter: 4.2mm
Exit Pupil Distance: 16.4mm (center), 15.8mm (edge)
Prism Type: BAK4
Waterproofing: IPX7, nitrogen-filled
Weight: 1.16 lbs (525g)
Dimensions: 130mm x 120mm (5.12" x 4.72")
Working Temperature: -15°C to 60°C
Storage Temperature: -20°C to 60°C
Optical Performance
Now, let’s talk about what really matters—optical performance. These binoculars come equipped with four pieces of ED glass and two pieces of high-refractive index glass, ensuring minimal color fringing and a decently sharp, true-to-life image. The multi-layer coating enhances light transmission, boasting an impressive 88.5% transmittance rate. This means brighter, more vivid images even in challenging light conditions.
To top it off, the BAK4 prism provides higher-quality glass than the cheaper BK7 prisms found in some other binoculars. This makes the SIRUI Beyond B1042A great for low-light viewing, whether you're out in the early morning or observing wildlife at dusk.
Durability and Design
Out in the field, durability is crucial, and SIRUI doesn’t disappoint here. These binoculars are built tough with IPX7 waterproofing and nitrogen-filled barrels, so you don’t have to worry about water or fog compromising your view. Whether you’re in extreme heat or cold, these binoculars can handle temperatures ranging from -15°C to 60°C while still performing well. So, for anyone in the United States that is 5 degrees F to 140 degrees F.
I have definitely glassed in temperatures below 5 degrees for short amounts of time and it is miserable, but that fact that these have a 5 degree limit makes me nervous for western late season hunting.
Functionality
The design is also user-friendly. You’ve got a central focusing wheel for easy adjustments, a right diopter focusing ring for personalized sharpness, and four-step adjustable eyecups, making these binoculars versatile for everyone, whether you wear glasses or not.
Accessories and Compatibility
SIRUI has thought about functionality too. The binoculars have a 1/4”-20 threaded hole that allows you to mount them on a tripod using the optional BA-2 binocular adapter. This is perfect if you need steady, long-term observation, like for astronomy or extended wildlife watching. Plus, you can even attach your phone using the SIRUI TS-M telescope mobile phone adapter to capture images directly from your binoculars.
As for accessories, the package includes a carrying bag, strap, lens cloth, and both eyepiece and objective lens caps. Everything you need to keep your binoculars protected and ready for your next adventure.
[Field Experience]
I took these binoculars on a couple of different outings, from a local birdwatching spot to a wildlife reserve. The image clarity was consistently sharp, especially for a pair in this price range. The 6° field of view—104.8 meters at 1000 meters—allowed me to track moving objects with ease. Whether I was scanning the landscape or following a bird in flight, the wide field of view was a definite advantage.
[Pros and Cons]
Pros:
Great optical quality for the price, thanks to the ED glass and BAK4 prism.
Excellent in low-light conditions, making them versatile for early morning or late evening use.
Durable build with waterproofing and fog resistance, ideal for outdoor adventures.
Comfortable to use with the large 20mm eyepiece and 4-step adjustable eyecups.
I love the small compact size of these binoculars.
I love the rubberized armor and grip
Cons:
No Lifetime Unconditional Warranty, I feel like for this price range I would rather buy vortex and have extra piece of mind.
I wish the diopter adjustment was labeled
Overall, Image quality
Conclusion
Overall, the SIRUI Beyond B1042A Binoculars offer a lot of value for under $200. Their excellent optical performance, robust build, and versatile design make them a great choice for nature observation, hunting, or even casual astronomy. If you’re looking for a reliable pair of binoculars that won’t break the bank, these are worth considering.
Outro
Thanks for reading and remember to stay connected to the wild! If you found this article helpful, subscribe to my email for more outdoor gear reviews and adventures. You can also follow me on any of the woke media outlets—I mean, social media platforms—if you haven’t already. Also, leave a comment below if you’ve tried these binoculars or if you have a favorite pair you’d recommend. Once again, I’m Chris with Ignited by Nature. Until next time, guys and gals!

The Outin Nano Portable Espresso Machine: Is it worth it?
Intro:
Hey there, guys and gals! This is Chris with Ignited by Nature, and welcome back! Today, I’m looking at the Outin Nano Portable Espresso Machine. For those who love their coffee as much as they love the great outdoors, this portable espresso machine promises to deliver rich, crema-topped espresso anywhere you go. But does it live up to the hype? Let’s find out.
Key Features
The Outin Nano is a compact, battery-powered espresso maker designed for outdoor adventures, road trips, or anywhere you want espresso without a full coffee setup. Let’s look at some key features:
• First of its Compact and Lightweight: It weighs approximately 1 lb 5 oz with the grounds/capsule holder and fits easily into a backpack. With water and coffee grounds, it weighs a total of 1 lb 8 oz, and without water, it’s 1 lb 6 oz.
• It’s Battery-Powered: It comes with a 7500 mAh battery that is fully rechargeable via USB-C. It makes up to four 50 ml shots or three 70 ml shots on a full charge. I tested it with room-temperature water; if you want to conserve battery life, I recommend boiling the water first. Outin says with hot water, you can brew up to 200 times on a single charge.
• The machine has a 20-Bar Pressure Pump: The built-in pump produces 20 bars of pressure, delivering true espresso.
• The Water Capacity: The machine holds 80 ml of water, enough to brew a double shot of espresso.
• It’s also Versatile: It’s compatible with both ground coffee and Nespresso pods (it takes the smaller pods, not the newer larger ones).
• Next, I want to talk about how this brew. It heats water and brews espresso in as little as 2 minutes 45 seconds with a full charge. On average, it takes 2 minutes 29 seconds. However, on the fourth and final brew, it took about 3 minutes 22 seconds. I noticed that as the battery drains, brewing time increases.
• Simple Operation: It has a one-button operation for easy use.
Build and Design Quality:
The Outin Nano is designed with portability in mind. It’s small enough to fit in a backpack or cup holder, making it easy to carry on hikes, camping trips, or even road trips. The build quality feels sturdy, and the materials seem durable enough for outdoor use. One of its key features is the rechargeable battery, so you don’t need an external power source—just charge it up, and you’re ready to go.
The design is sleek and modern, built with durable plastic that feels solid in hand. It’s about the size of a 32 oz Nalgene bottle, so while it’s portable, it’s not exactly "nano" in size. If you’re willing to pack the extra weight (around 1.5 pounds), it’s a good option for making a decent cup of coffee in the backcountry.
Performance:
Let’s talk about performance. The 20-bar pressure pump extracts coffee oils and crema, giving you a true espresso experience. After testing, I found the flavor to be smooth and decently rich, especially compared to instant coffee and other backcountry options. I also noticed that after drinking it, I had to poop immediately, which I take as a good indication of a strong brew!
The fact that it heats water and brews coffee on the go is a huge plus, especially when you’re out in the field. However, if you’re hiking, I suggest boiling your water with a camp stove before use to conserve battery life.
Here’s a summary of my performance tests:
• As far as Brewing Time goes: It takes about 5 minutes to heat cold water, and room-temperature water takes just under 3 minutes, with the fastest time being 2 minutes 45 seconds. Preheating the water and double tapping the button allows instant brewing.
• Brewing Quality: It produces a surprisingly good espresso shot for its size. The crema is decent, and the flavor is rich, especially with fresh grounds. While it’s not on par with a professional espresso machine, it’s a solid upgrade from instant coffee. I’d even say it’s better than Starbucks, which isn’t saying much, but I’ll say it anyway!
• Versatility: I love the flexibility of using both ground coffee and pods. I prefer Nespresso pods for their convenience in the field.
As far as Ease of Use goes:
To use the machine, simply add water—cold, lukewarm, or boiling. Then, add coffee grounds to the holder or use a Nespresso pod. Place the larger end of the holder upwards, screw on the cap, and press and hold the button for 2 seconds to heat the coffee. Double-tap the button if the water is already hot for instant brewing.
Ok so now let’s go over everyone’s favorite thing, Pros and Cons
As far as Pros go:
• The Outin is Portable: Weighing just under 1.5 pounds, it’s compact, though not the lightest. For coffee lovers, it’s worth considering.
• It’s Battery-Powered: No need for an external power source, and it can brew and heat up to 4 shots per charge via USB-C.
• This thing is also Easy to Use: It has simple, one-button operation.
• For a battery operated device it has a pretty quick brew Time: The machine heats and brews in 30 to 45 seconds with hot water, or as quickly as 2 minutes 45 seconds with room-temperature water.
• The Espresso Quality is Impressive for a portable device, with decent crema and rich flavor. It’s far better than hotel or backcountry coffee.
Moving on to the Cons now:
• We will first take a look at Cost: At $149.99, it’s pricey but may be worth it if you love espresso.
• The Battery Life is not great if you want to heat your water. 4 shots per charge is decent but may not be enough for longer trips without recharging. However, boiling the water first extends battery life, potentially lasting for up to 200 brews.
• This machine has a Small Water Tank: The 80 ml capacity means you are making frequent refills if you are making coffee for more than one person.
• Another con would be the Weight: At 1 lb 5 oz, it’s not ultralight. For ultralight backpackers, the extra weight might not be worth it for a cup of coffee.
• For some the Temperature of the water might not be hot enough: The machine brews at up to 130°F, but preheating the water gives better results. If you’re in a hurry, boiling water first saves time and battery life.
So Who is this for?
If you can’t go without a quality espresso even while your miles from civilization, this portable espresso machine might be for you. It’s great for campers, hikers, and road trippers who want to elevate their outdoor coffee game. However, if you’re aiming for an ultralight pack, this might feel like unnecessary weight. Personally, I wouldn’t take this on a hunting trip due to the extra gear that I already carry, but I would bring it along on a backpacking or scouting trip. My wife definitely loves this machine, and she is going to make me take it with us on our feature outdoor adventures.
Conclusion:
To wrap this up, the Outin Nano Portable Espresso Machine is a fantastic gadget for coffee lovers who enjoy the outdoors. It’s easy to use, delivers surprisingly good espresso, and doesn’t require much setup or space. While the weight and battery life might be concerning for some, especially on longer trips, the convenience of brewing a fresh shot of espresso in the wild is hard to beat.
Closing:
Thanks for reading, and remember to stay connected to the wild! If you found this information helpful, subscribe to my mailing list for more outdoor gear reviews and adventures. You can also follow me on any of the woke media outlets—I mean, social media platforms—if you haven’t already ;). Leave a comment below to share your thoughts or let me know what gear you’re using for your coffee on the go. Once again, I’m Chris with Ignited by Nature. Until next time, guys and gals!
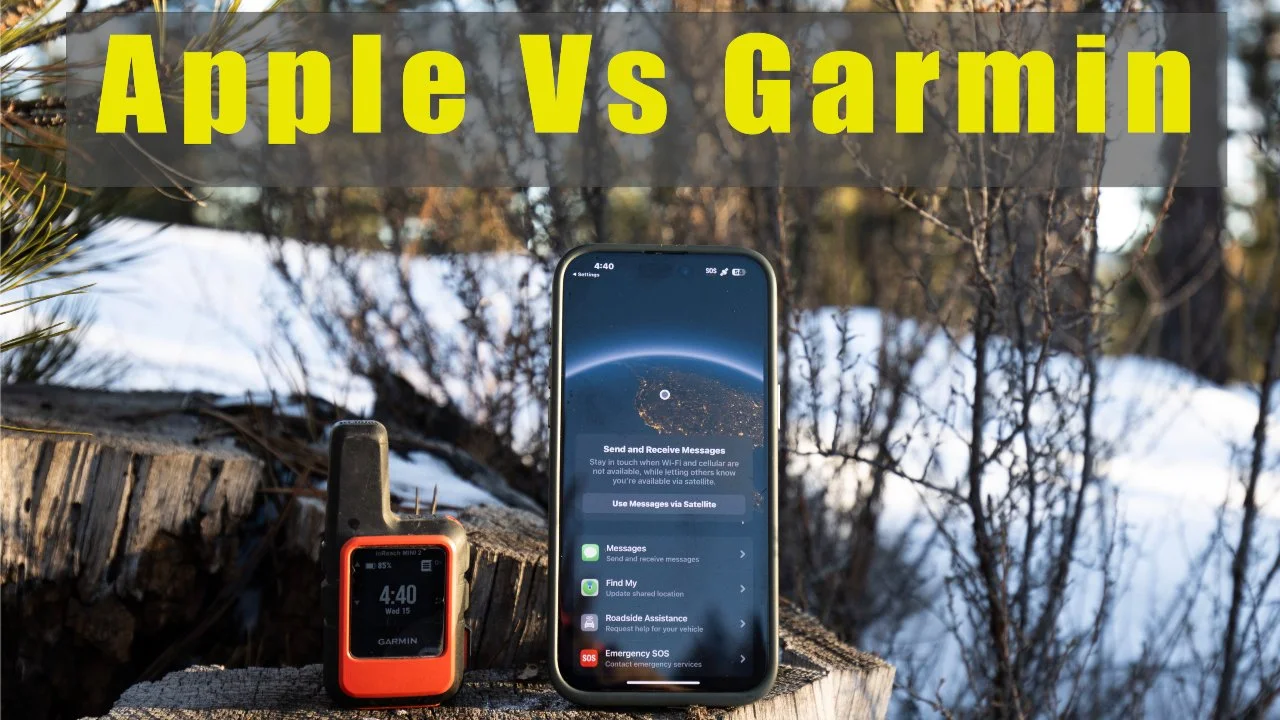
Garmin inReach vs Apple Message via Satellite : Why I’m Switching to Apple
In this article, I put the Garmin inReach Mini series 🛰️ up against Apple's Message Via Satellite feature 📱. If you're an outdoor enthusiast 🏕️, hiker 🚶♂️, or adventurer 🌍, reliable satellite communication is a must when you're off the grid. But which one is better for your needs? I’ll dive into the features, reliability, SOS capabilities 🚨, and costs 💰 of both options to help you make an informed decision. Whether you’re deep in the backcountry 🏞️ or just want peace of mind, this comparison will show you which device has your back. Don't miss it!
INTRO
Hey there, guys and gals! This is Chris with Ignited by Nature, and welcome back. Today, I’m doing a quick, high-level comparison between two key tools for outdoor communication: the Garmin inReach and Apple’s new Message via Satellite feature. Whether you're heading into the backcountry or just want peace of mind while off the grid, both options are great—but there’s a big difference that’s making me switch.
SECTION 1: GARMIN INREACH
First up is the Garmin inReach. I’ve used both the Garmin inReach Mini and Mini 2, and both devices are well-known for their reliable satellite communication. With them, you can send and receive messages, share your location, check weather, track your activities, and even trigger an SOS to emergency services if things go south.
It’s been my go-to for years because it allows me to stay in touch, even in the most remote areas. Both devices use apps—either Earthmate or Explore—that allow you to text via your phone and use a plethora of other Garmin functions, interfacing seamlessly with your phone.
But here’s the catch: the Garmin inReach requires a subscription. Plans can start around $15 a month for basic use, but to unlock the full features, like unlimited messaging and weather updates, you're looking at closer to $50 a month.
For me, I’ve been paying for the $50-a-month plan for almost two years now. I live in an area where I don’t have cell service once I leave the house and don’t get it again until I reach town.
The inReach has given my wife and I peace of mind by allowing us to stay in communication when traveling to and from town for business, while also providing the option to reach emergency services if necessary. It’s also been incredibly useful when I’m out hunting or hiking.
SECTION 2: APPLE MESSAGE VIA SATELLITE
Now, Apple recently introduced their Message via Satellite feature, which I have been using since September 2024. It’s available on newer iPhone models—14 and up. Shout out to my buddy Forrest for turning me on to this feature, by the way!
This feature allows you to send emergency texts when you're outside of cellular and Wi-Fi coverage, using satellites to connect you directly to friends and family at home.
It’s not as feature-packed as the Garmin inReach—you can’t send messages quickly, check the weather, or track your location in real-time—but it gets the job done in emergency situations.
With Message via Satellite, you can text, send your location, and even request emergency services. However, you do have to stay connected to the satellite to send and receive messages, which can be a bit of a hassle.
You may find yourself rolling around in your sleeping bag at night trying to find the satellite or moving around in circles on top of a mountain just to stay connected, but for me, the slight inconvenience is worth the cost difference. I will add that over the past 6 months of using this product and as of January 2025 I can say that this service has improved significantly for the iPhone and the messaging feature once connected is fast and responsive, way more so than it was when in first started using this feature in September of 2024.
Also, I did want to add that I’ve heard some podcasters and YouTubers criticize it for being difficult to use, but many of them are either selling Garmin products or are sponsored by Garmin.
I’ve used this service heavily during my hunting season—about four weeks of heavy field use—and during daily traveling to and from town for the past six months, and it has worked great.In fact, my wife and I unfortunately had to use emergency services via Message via Satellite this past December.
Basically, my wife was in a car accident driving down into Boise. She didn’t have cell service where she wrecked, but we were able to stay in contact using Apple’s service, and it worked perfectly for us. She was also able to contact emergency services and get help using this service which was awesome because I wasn’t able to get over to her for almost and hour and a half.
So, with all that being said, here is the real kicker with Message via Satellite: it’s free for two years with most new iPhones, models 14 and up. No monthly subscription, no extra fees. And for someone like me who just needs peace of mind while off-grid or driving home, it’s hard to argue with a service that’s free and still offers emergency satellite communication. Plus, it’s one less thing to charge in the backcountry, and I’m all about minimizing my electronic footprint and carrying less.
SECTION 3: WHY I’M SWITCHING TO APPLE
At the end of the day, I’m switching to Apple’s Message via Satellite because it’s free and gets the job done. As much as I’ve loved using the Garmin inReach, paying $50 a month for satellite messaging when I can get emergency communication for free on my iPhone is a no-brainer.
Also, I use ONX Hunt maps for navigation, so the mapping feature on the inReach isn’t necessary. I’ll lose some of the advanced features Garmin offers, like real-time tracking, weather updates, and two-way messaging, but for most of my trips, the free satellite service from Apple is all I really need.
If you’re like me and don’t need constant satellite connection but want that safety net when you're off the grid, Apple’s Message via Satellite is worth considering—especially while it’s free.
CONCLUSION
Thanks for reading and remember to stay connected to the wild! If you found this article helpful, subscribe to my mailing list for more outdoor gear reviews and adventures. Also, leave a comment below and tell me what you think about satellite communication. Once again, I’m Chris with Ignited by Nature. Until next time, guys and gals!

Is the Vortex Razor HD 13-39x56 Spotting Scope Worth It? Full Field Test & Review
Get an in-depth look at the Vortex Razor HD 13-39x56 Spotting Scope as we put it to the test in the field. Discover its pros and cons, image quality, and whether it's the right fit for your outdoor needs.
Today, I’m diving into the RAZOR® HD 13-39x56 spotting scope. Whether you're glassing for game or birdwatching, this scope offers premium features. Let’s take a closer look at what makes it stand out in the field."
FEATURES OVERVIEW
The RAZOR® HD 13-39x56 is designed around Vortex’s HD Optical System. This system is optimized with select glass elements to deliver exceptional resolution, cut chromatic aberration, and provide fantastic color fidelity and sharpness. However, I did notice some clarity loss along the edges of the image.
It also features XR™ Plus lens coatings, which maximize light transmission for peak clarity, especially in low-light conditions. This is a major plus for early morning or evening glassing sessions.
OPTICAL PERFORMANCE
The optical performance of the RAZOR® HD is impressive. With magnification ranging from 13x to 39x and a 56mm objective lens, it offers bright, clear views of distant subjects, making it ideal for spotting wildlife at various ranges.
Dielectric Prism Coatings provide bright, clear, and color-accurate images, and the Phase Correction coatings enhance resolution and contrast. The apochromatic, index-matched lenses ensure that you get true-to-life colors across the entire visual spectrum.
While the center of the image is incredibly sharp, there is some edge softness. This is likely due to the coatings and glass quality, but it doesn’t detract too much from the overall viewing experience.
SPECIFICATIONS
Here are the key specs of the RAZOR® HD 13-39x56:
Magnification: 13-39x
Objective Lens Diameter: 56mm
Eye Relief: 15.0mm - 17.8mm
Angular Field of View: 3.2° - 1.7°
Close Focus: 9.2 feet
Linear Field of View: 168' - 89' at 1000 yards
Length: 10.4 inches
Weight: 28.6 ounces"
With a weight of just 28.6 ounces and a compact length of 10.4 inches, this scope is easy to carry around, making it an excellent option for backcountry hunters or anyone who needs portability without sacrificing performance.
STRAIGHT RAZOR MODEL
Now, if you’re interested in a slightly different form factor, the RAZOR® HD 13-39x56 also comes in the Straight Razor model, which is 11.1 inches long. This version gives you a more direct line of sight, making it ideal for users who prefer a straight-through design when spotting.
BUILD & DURABILITY
Christopher (on camera):
Durability is another strong suit for the RAZOR® HD. It features Armortek® coatings that protect the lenses from scratches, oil, and dirt, and the rugged rubber armor gives it a secure, non-slip grip, even in wet conditions.
The scope is argon gas-purged and O-ring sealed, ensuring it’s fogproof and waterproof. Whether you're out in heavy rain or snow, the RAZOR® HD will hold up in tough weather conditions. Plus, it’s shockproof, so it can withstand impacts from rough use in the field.
FOCUS & ERGONOMICS
The helical focus mechanism is smooth and precise, allowing you to dial in your focus quickly and with ease. This is crucial when you’re adjusting for different distances during long glassing sessions.
The RAZOR® HD is also tripod adaptable and Arca-Swiss compatible, allowing you to mount it on a tripod or car window mount for steady viewing, which is incredibly useful when you're using it for extended periods.
PORTABILITY & FIELD USE
Weighing just 28.6 ounces, this scope is compact and lightweight. It’s easy to carry on long hikes without adding unnecessary weight to your pack.
PROS & CONS
Let’s wrap up with the pros and cons.
Pros:
HD Optical System with apochromatic lenses for superior color correction
XR™ Plus coatings for maximum light transmission and clarity
Dielectric Prism Coatings for bright, accurate images
Waterproof, fogproof, and shockproof construction with argon gas purging
Armortek® coating protects lenses from scratches, oil, and dirt
Tripod adaptable and Arca-Swiss compatible
Lightweight and compact, great for backcountry use
Available in both angled and straight versions (Straight Razor: 11.1" long)
Vortex VIP Warranty
Cons:
Slight loss of clarity along the edges
Limited magnification range (13x-39x)
Price point may be higher compared to some competitors
CONCLUSION
Overall, the RAZOR® HD 13-39x56 is a fantastic spotting scope. While the edge softness may be a downside to this optic for some, its optical clarity, rugged build, price, and compact design make it an excellent choice for anyone needing a lightweight, high-performance scope for the field. And with the Straight Razor version at 11.1 inches, you get a more direct line of sight for those who prefer that style.
"Thanks for reading! If you enjoyed this review, be sure to subscribe to my newsletter for more outdoor gear reviews. See you next time, and stay ignited by nature!"

Swarovski STC vs. ATC: A Comprehensive Comparison
The Swarovski ATC (Angled Telescope Compact) and STC (Straight Telescope Compact) spotting scopes are top-tier optical instruments designed for hunters, nature enthusiasts and birdwatchers. Crafted with precision, these scopes feature high-definition fluoride glass lenses and advanced coatings, delivering exceptional clarity and color fidelity. Their compact and lightweight design, combined with robust magnesium housing, ensures durability and portability. Both models offer a user-friendly experience, with smooth focus adjustments and compatibility with various accessories. In diverse environments, from dense forests to wetlands, the ATC and STC excel, providing bright, vivid images even in low-light conditions. These scopes are a worthy investment for serious observers seeking unparalleled quality and performance.
When it comes to high-quality spotting scopes, Swarovski is a name that stands out for its exceptional craftsmanship and optical performance. Two of their most popular compact models, the STC (Straight Telescope Compact) and ATC (Angled Telescope Compact), offer top-tier features in portable designs. In this article, we’ll delve into a detailed comparison of these two models to help you decide which one suits your needs best.
Design and Build Quality
STC (Straight Telescope Compact)
The STC features a straight body design, which is particularly intuitive and user-friendly. This design is beneficial for quickly spotting and tracking moving subjects, making it a favorite among birdwatchers and nature enthusiasts. The straight alignment means you can follow a subject without having to adjust your viewing angle drastically. I prefer this scope for target shooting and just general-purpose use. I find that it is easy to pack and the process of acquiring your target is much faster.
In terms of build, the STC is lightweight and compact, ideal for those who need a spotting scope that is easy to carry on long hikes or trips. Swarovski’s renowned durability is evident here, with robust construction that includes a rubberized coating, excellent waterproofing and fog-proofing capabilities, ensuring the scope can withstand harsh environmental conditions.
ATC (Angled Telescope Compact)
The ATC, on the other hand, features an angled body design. This can be more comfortable for extended viewing sessions, particularly when the scope is mounted on a tripod. The angled eyepiece allows for a more relaxed viewing position, reducing neck strain over long periods.
Like the STC, the ATC is also lightweight and compact, maintaining the portability that is essential for outdoor adventures. It shares the same high standard of build quality, with superior weather resistance and durability that Swarovski is known for.
Thread Options and using the Included Half Shell
Both scopes have a 3/8” main thread and a 3/8 to ¼ inch adapter. I find that the Peak Design quick adapter works well on this spotting scope. This adapter is smaller and works with the smaller surface area and works with any arca swiss mounts.
Another cool added feature to these scopes would be the half shell.
In addition to its protective function, the Half Shell offers practical benefits that enhance the usability and convenience of the ATC and STC spotting scopes when you’re on the go. The half shells ergonomic design allows for easy access to the scope's controls, including the eyepiece and focus wheel, without the need to remove the protective cover. This ensures that users can operate the scope seamlessly in any environment, even in wet or slippery conditions. The half shell allows you to prop your scope on your truck door, on stumps, rocks or even on your side by side or atv. This gives you incredible versatility in the field and the option to use this scope without a tripod. Furthermore, the Half Shell features a quick installation and removal process, allowing users to deploy or stow their scopes rapidly and securely.
I would say that the one downside of the half shell is that it is not stable enough for Digi scoping in most situations. It provides a solid support but If you want quality footage you will need to use a tripod.
Optical Performance
STC
The optical performance of the STC is impressive, thanks to its straight design. The scope features Swarovski’s premium lens coatings (SwaroTop, SwaroDur,SwaroClean and SwaroBright) and high-quality glass, delivering sharp, clear images with excellent color fidelity and contrast. This makes it an excellent choice for detailed observation and identifying subtle differences in color and texture.
ATC
The ATC’s angled design does not compromise on optical quality. It also utilizes Swarovski’s top-tier lenses and coatings, providing stunning clarity and vibrant colors. The angled eyepiece can be particularly advantageous when observing objects at higher angles, such as birds in trees or celestial bodies, without straining your neck.
The ATC and STC use Field Flattening lens technology and fluoride-containing HD lenses that minimize chromatic aberration, providing high-contrast, sharp images even at the highest magnifications. This optical precision is crucial for identifying subtle details and colors in birds, animals, and landscapes.
Eyepiece Specifications for the ATC and STC
Magnification and Field of View
Magnification: Both the ATC and STC offer a magnification range of 17x to 40x.
Field of View (at 1000 Yds): At 17x magnification, the field of view is approximately 186 ft. At 40x magnification, it narrows down to around 102 feet. This range allows for both wide-angle views and detailed close-ups, making these scopes versatile for various observation needs.
Eye Relief
Eye Relief: The eye relief for both models is around 20 mm. This generous eye relief is designed to provide comfortable viewing, even for users who wear glasses.
Exit Pupil Diameter
Exit Pupil Diameter: At 17x magnification, the exit pupil diameter is about 3.4 mm. At 40x magnification, it is approximately 1.4 mm. This range helps ensure bright images even at higher magnifications, contributing to better performance in low-light conditions. For the best viewing experience and the brightest images you will want to view your intended target at the lowest magnification.
Eyepiece Design
The eyepieces on the ATC and STC are designed to be user-friendly and ergonomic. Here are some key features:
Twist-In Eyecups: The eyecups on both models can be twisted in and out to accommodate users with or without eyeglasses. This adjustability ensures a comfortable viewing experience for all users.
Integrated Design: The integrated eyepiece design means that it is not interchangeable. This design choice helps keep the scopes compact and lightweight, making them more portable and easier to handle in the field. These models are built off the ATX/STX eyepiece so if you are using a digiscoping device and already own the larger models you should have to buy any new gear.
Optical Quality
The eyepieces on both the ATC and STC benefit from Swarovski's advanced optical technologies, including:
Field Flattener Lenses: These lenses ensure that the image is sharp and distortion-free from edge to edge, providing a high-quality viewing experience across the entire field of view.
HD Optics: High-definition lenses with fluoride elements reduce chromatic aberrations, resulting in high-contrast, color-accurate images.
Coatings: The same advanced coatings as all Swarovski Products are applied to these scopes, coatings such as SWAROTOP, SWARODUR, and SWAROCLEAN, are applied to the eyepieces to enhance light transmission, durability, and ease of cleaning.
Usability and Comfort
STC
The STC’s straight design is particularly user-friendly for beginners, as it aligns directly with your line of sight. This makes it very convenient for quick spotting and tracking of moving subjects, offering an intuitive viewing experience.
ATC
While the angled design of the ATC might require a bit of an adjustment period for those not used to it, it offers superior comfort for prolonged use. The ability to use the scope comfortably on a lower tripod setting is a significant advantage, reducing overall gear weight and improving stability. This makes the ATC ideal for long-term observations and shared viewing sessions.
Value and Pricing
Both the STC and ATC are premium products, reflecting Swarovski’s commitment to quality and performance. As such, they come with a higher price tag $2569, but the investment is justified by the exceptional durability, optical clarity, and overall user experience they provide.
The choice between the two models ultimately comes down to personal preference and specific use cases rather than a significant difference in price.
Conclusion
In conclusion, both the Swarovski STC and ATC offer outstanding quality and performance in a compact form factor. Your choice should depend on your specific needs and preferences:
Choose the STC if you prefer a straight design for quick spotting and ease of use on the go. Its intuitive alignment and bright image in low-light conditions make it ideal for dynamic observation.
Opt for the ATC if you prioritize comfort during extended viewing sessions and need the versatility of an angled eyepiece. Its ergonomic design and ability to comfortably view higher angles make it perfect for long-term use and shared viewing experiences.
No matter which model you choose, you’re investing in a piece of equipment that will provide incredible views and last for years to come. Both the STC and ATC exemplify Swarovski’s dedication to quality, making them worthy additions to any outdoor enthusiast’s gear collection.

Navigating Choices: A Comprehensive Comparison of Swarovski NL Pure 8x42 and 8x32 Binoculars
When it comes to precision optics, Swarovski sets the gold standard, and their NL Pure series stands at the pinnacle of optical engineering. In this comparison, we delve into the exquisite nuances that distinguish the NL Pure 8x32 and NL Pure 8x42 binoculars, two masterpieces crafted to redefine the way we perceive the world around us.

8x32 (Burnt Orange) vs 8x42 (Green)
Introduction:
Join me on this exploration as we delve into the world of Swarovski optics, specifically focusing on the NL Pure 8x42 and 8x32 binoculars. While personal preferences play a crucial role, the performance of these binoculars varies based on factors such as size, weight and low-light performance.
It's important to mention that Swarovski, known for providing top-tier optical solutions, has earned my endorsement through years of experimenting with different optics. I'd like to clarify that I am not sponsored by Swarovski, and both binoculars were purchased with my own funds for this review.
Now that we've covered that, let's delve into the details of these binoculars and determine which 8-power NL Pure model aligns with your needs!
Binocular Specifications:
For our comparison, I've selected the NL Pure 8x42 and pitted it against the NL Pure 8x32. These models cater to different preferences, with the 8x42 excelling in low-light conditions, while the 8x32 offers a more compact and portable alternative.
Pricing:
Firstly, let’s talk about pricing. The 42mm NL Pure binoculars come with a price tag of $3,449.00, reflecting their advanced features. In contrast, the 32mm NL Pure’s are more budget-friendly at $2,899.00, providing an attractive option for those conscious of their budget.
Physical Characteristics:
Now, let’s delve into the physical characteristics of each binocular:
NL Pure 8x42:
• Length: 6.2 in
• Width: 5.1 in
• Height: 2.8 in
• Weight: 29.5 oz

8x32 (Burnt Orange) side by side with 8x42 NL Pure binoculars.
NL Pure 8x32:
• Length: 5.7 in
• Width: 5.1 in
• Height: 2.6 in
• Weight: 22.8 oz
While both binoculars share the same width, the 8x32 is 8 percent shorter in length, 7 percent shorter in height, and 23 percent lighter than its 42mm counterpart. This distinction provides users with a trade-off between low-light performance and portability, allowing them to align their choice with their specific needs.
Optical Characteristics:
Both models feature 8x magnification, but the NL Pure 8x42 sports a 42mm objective lens diameter, while the NL Pure 8x32 comes in with a 32mm objective lens diameter. The 8x42 also boasts a larger exit pupil diameter of 5.3mm compared to the 8x32's 4mm exit pupil. Additionally, the field of view for the 8x42 is 477 ft/1000 yds, 9.1°, and for the 8x32, it's 450 ft/1000 yds, 8.5°. Thus, the 42mm objective provides 27 more feet of edge-to-edge clarity at 1000 yards.

Low Light Performance:
In low-light conditions, the larger lenses of the NL Pure 8x42 binoculars provide a brighter, better-quality view compared to the NL Pure 8x32. For overall low light performance, the exit pupil size is crucial, and more light is delivered to the eyes with the 8x42's larger exit pupil (5.3mm). The Twilight Factor, as per ISO 14132-1, is 18.3 for the 8x42 and 16.0 for the 8x32, indicating slightly better low-light performance overall for the former.
Twilight Factor and Low-Light Performance:
If you didn’t already know this, the Twilight Factor is a theoretical calculation obtained by multiplying the lens diameter by the magnification and taking the square root of the result. While a higher Twilight Factor suggests better detail visibility in low light, it's essential to note that a correspondingly large exit pupil is crucial for effective low-light use. Ideally, the exit pupil should be at least as large as the user's pupil. Binoculars with an exit pupil smaller than 4mm are unsuitable for low-light conditions, even if the Twilight Factor is high.
Optical Coatings and Light Transmission:
Both models feature Swarovski's renowned color fidelity, achieved through advanced optics coatings such as SWAROBRIGHT, SWAROTOP, and SWARODUR. These coatings contribute to a superior viewing experience by optimizing color fidelity, contrast, and resolution. While the NL Pure 8x32 has a slightly higher light transmission at 92% compared to the 91% of the 8x42, it's essential to note that light transmission is not the sole factor affecting image brightness and clarity. Other factors, such as magnification, field of view, and eye relief, also contribute to the overall image quality. Therefore, the 8x42 NL Pure binoculars offer brighter and clearer images due to factors like field of view, objective size, and eye relief.
Conclusion:

In my opinion, the NL Pure 8x42's larger objective lens diameter leads to sharper images and improved resolution, making it ideal for detailed observation in lower light conditions. As a hunter and observer of wildlife, I prefer the 8x42’s for their better performance during low light conditions and for its wider field of view.
With that being said, the NL Pure 8x32 binocular, despite a smaller objective lens, does still maintain excellent sharpness, that is suitable for users prioritizing portability without compromising clarity. I have tested both binoculars out in the field extensively and under normal lighting conditions you will not notice a difference between the two binoculars.
In my opinion, young adults with larger pupil sizes may perceive brighter images in low light conditions with both models. However, older individuals with potentially smaller pupils may find NL Pure 8x42 more beneficial, thanks to a larger overall exit pupil.
For me, the Swarovski NL Pure 8x42 and NL Pure 8x32 binoculars stand out as exceptional optical instruments, each catering to specific preferences and use cases. Whether choosing the 8x42 for enhanced low-light performance or the 8x32 for compact portability, you can expect a reliable and top-tier optical solution from Swarovski. The decision ultimately hinges on individual priorities, considering factors like size, weight, and specific use scenarios. If you are a hunter or nature observer who spends time during dawn and dusk observing wildlife then you will probably want to use the 8x42s. In contrast, if you are a birder or hiker wanting to observe wildlife during the day, but still want portability without sacrificing quality, then I would opt for the 8x32 binoculars.
Ultimately, the choice is yours, and now that we have gone over the major differences between these two 8 power binoculars, you should be able to make an educated decision and purchase that you will enjoy for many years to come. Thanks again for reading this article and I hope it helped broaden your understanding of optics and the specific characteristics that set them apart from each other and remember, “buy once cry once!”

Exo Mountain Gear K3 4800 vs. K4 5000: A Comprehensive Comparative Analysis
Introduction:
Embark on a detailed exploration of the evolution within Exo Mountain Gear's backpack lineup, spanning from the acclaimed K3 4800, released in 2019, to the cutting-edge K4 5000 unveiled in March 2023. This comprehensive analysis delves into the intricacies of these two backpack models, thoroughly examining their capacities, dimensions, frame materials, accessibility, functionality, pricing, additional features, and overall value proposition. The goal of this article is not to influence your preference toward one pack or the other but to provide you with the information necessary to make an informed decision.

K4 5000 vs K3 4800
Section 1: Pack Features
While the K4 and K3 may share a resemblance in size and shape, the K4 distinguishes itself as a completely overhauled pack designed from the ground up to outperform its predecessor, the K3. The K4 introduces a range of new features, including a larger removable lid, an additional 453 cubic inches of total space, a redesigned frame, enhanced organizational pockets, and improved comfort based on field testing experiences.
Despite the K3 proving itself as a reliable workhorse over the past five years, the K4 offers a more feature-rich, durable, and comfortable alternative for outdoor enthusiasts.Now, let’s delve into the distinctive features that set each model apart, starting with the K3 4800.
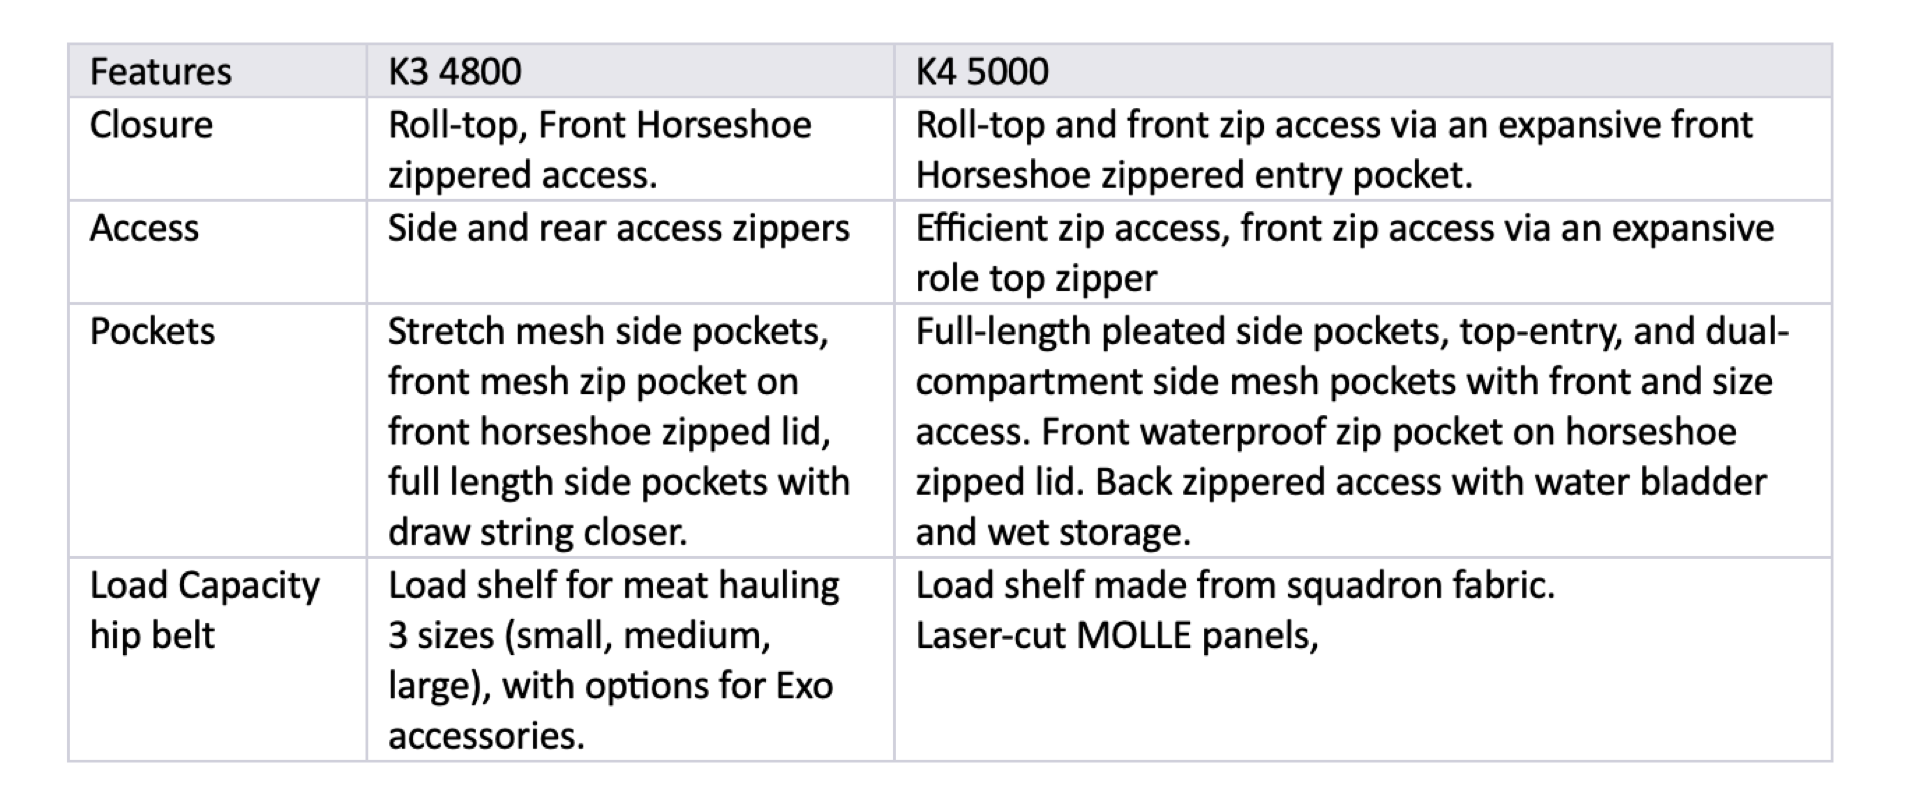
The pack features top access through a roll-top design, allowing for volume and size adjustments based on the scenario and also acting as a robust barrier against the elements. The K3 also boasts a small horseshoe zippered front access and a rear zippered water storage area, serving dual purposes as a space for a water bladder or wet gear storage. Side pockets, both deep drawstring and stretch mesh, provide versatile storage options for tools and gear.
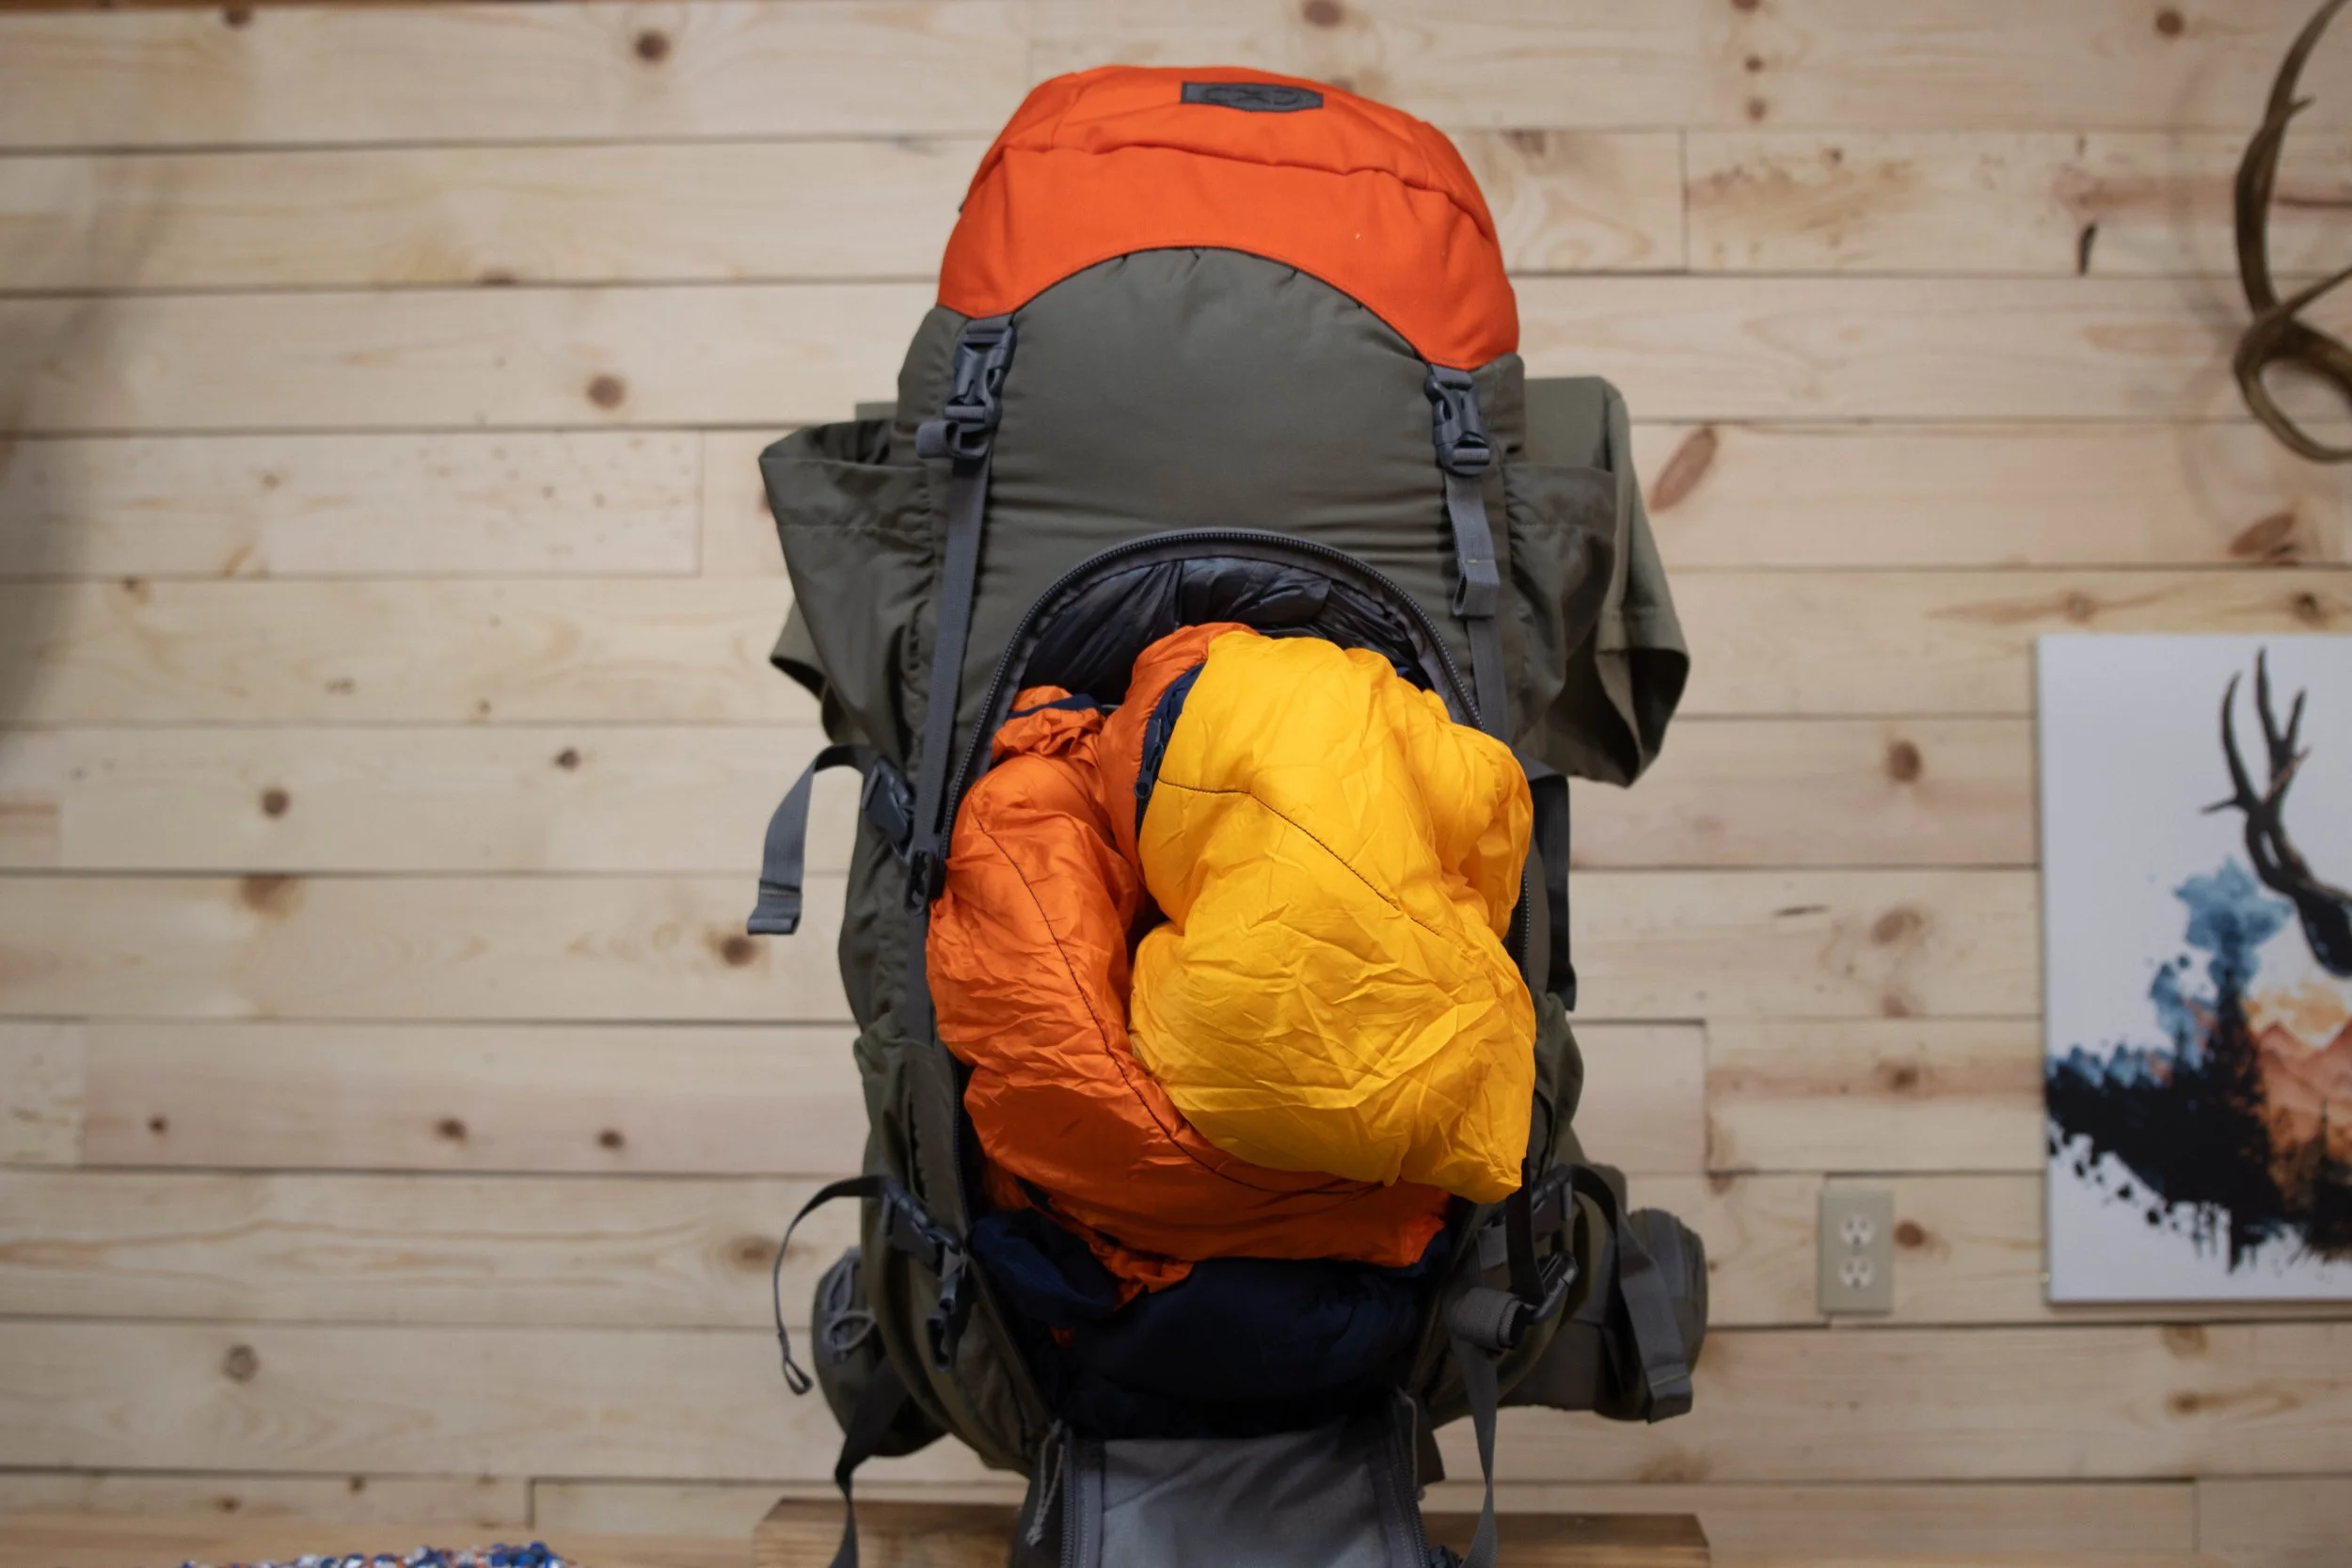
K3 4800 Front Horseshoe zippered access.
The K3's built-in meat shelf, featuring a load shelf for meat hauling, can be easily accessed by undoing four compression straps and a few Velcro connections at the top of the pack. The load shelf has garnered praise for its simplicity and durability, proving especially useful for me since 2020. With this pack, I have packed out 120-pound loads with ease over countless miles, and under heavy loads, the pack served its purpose, ensuring a safe journey home with my meat.
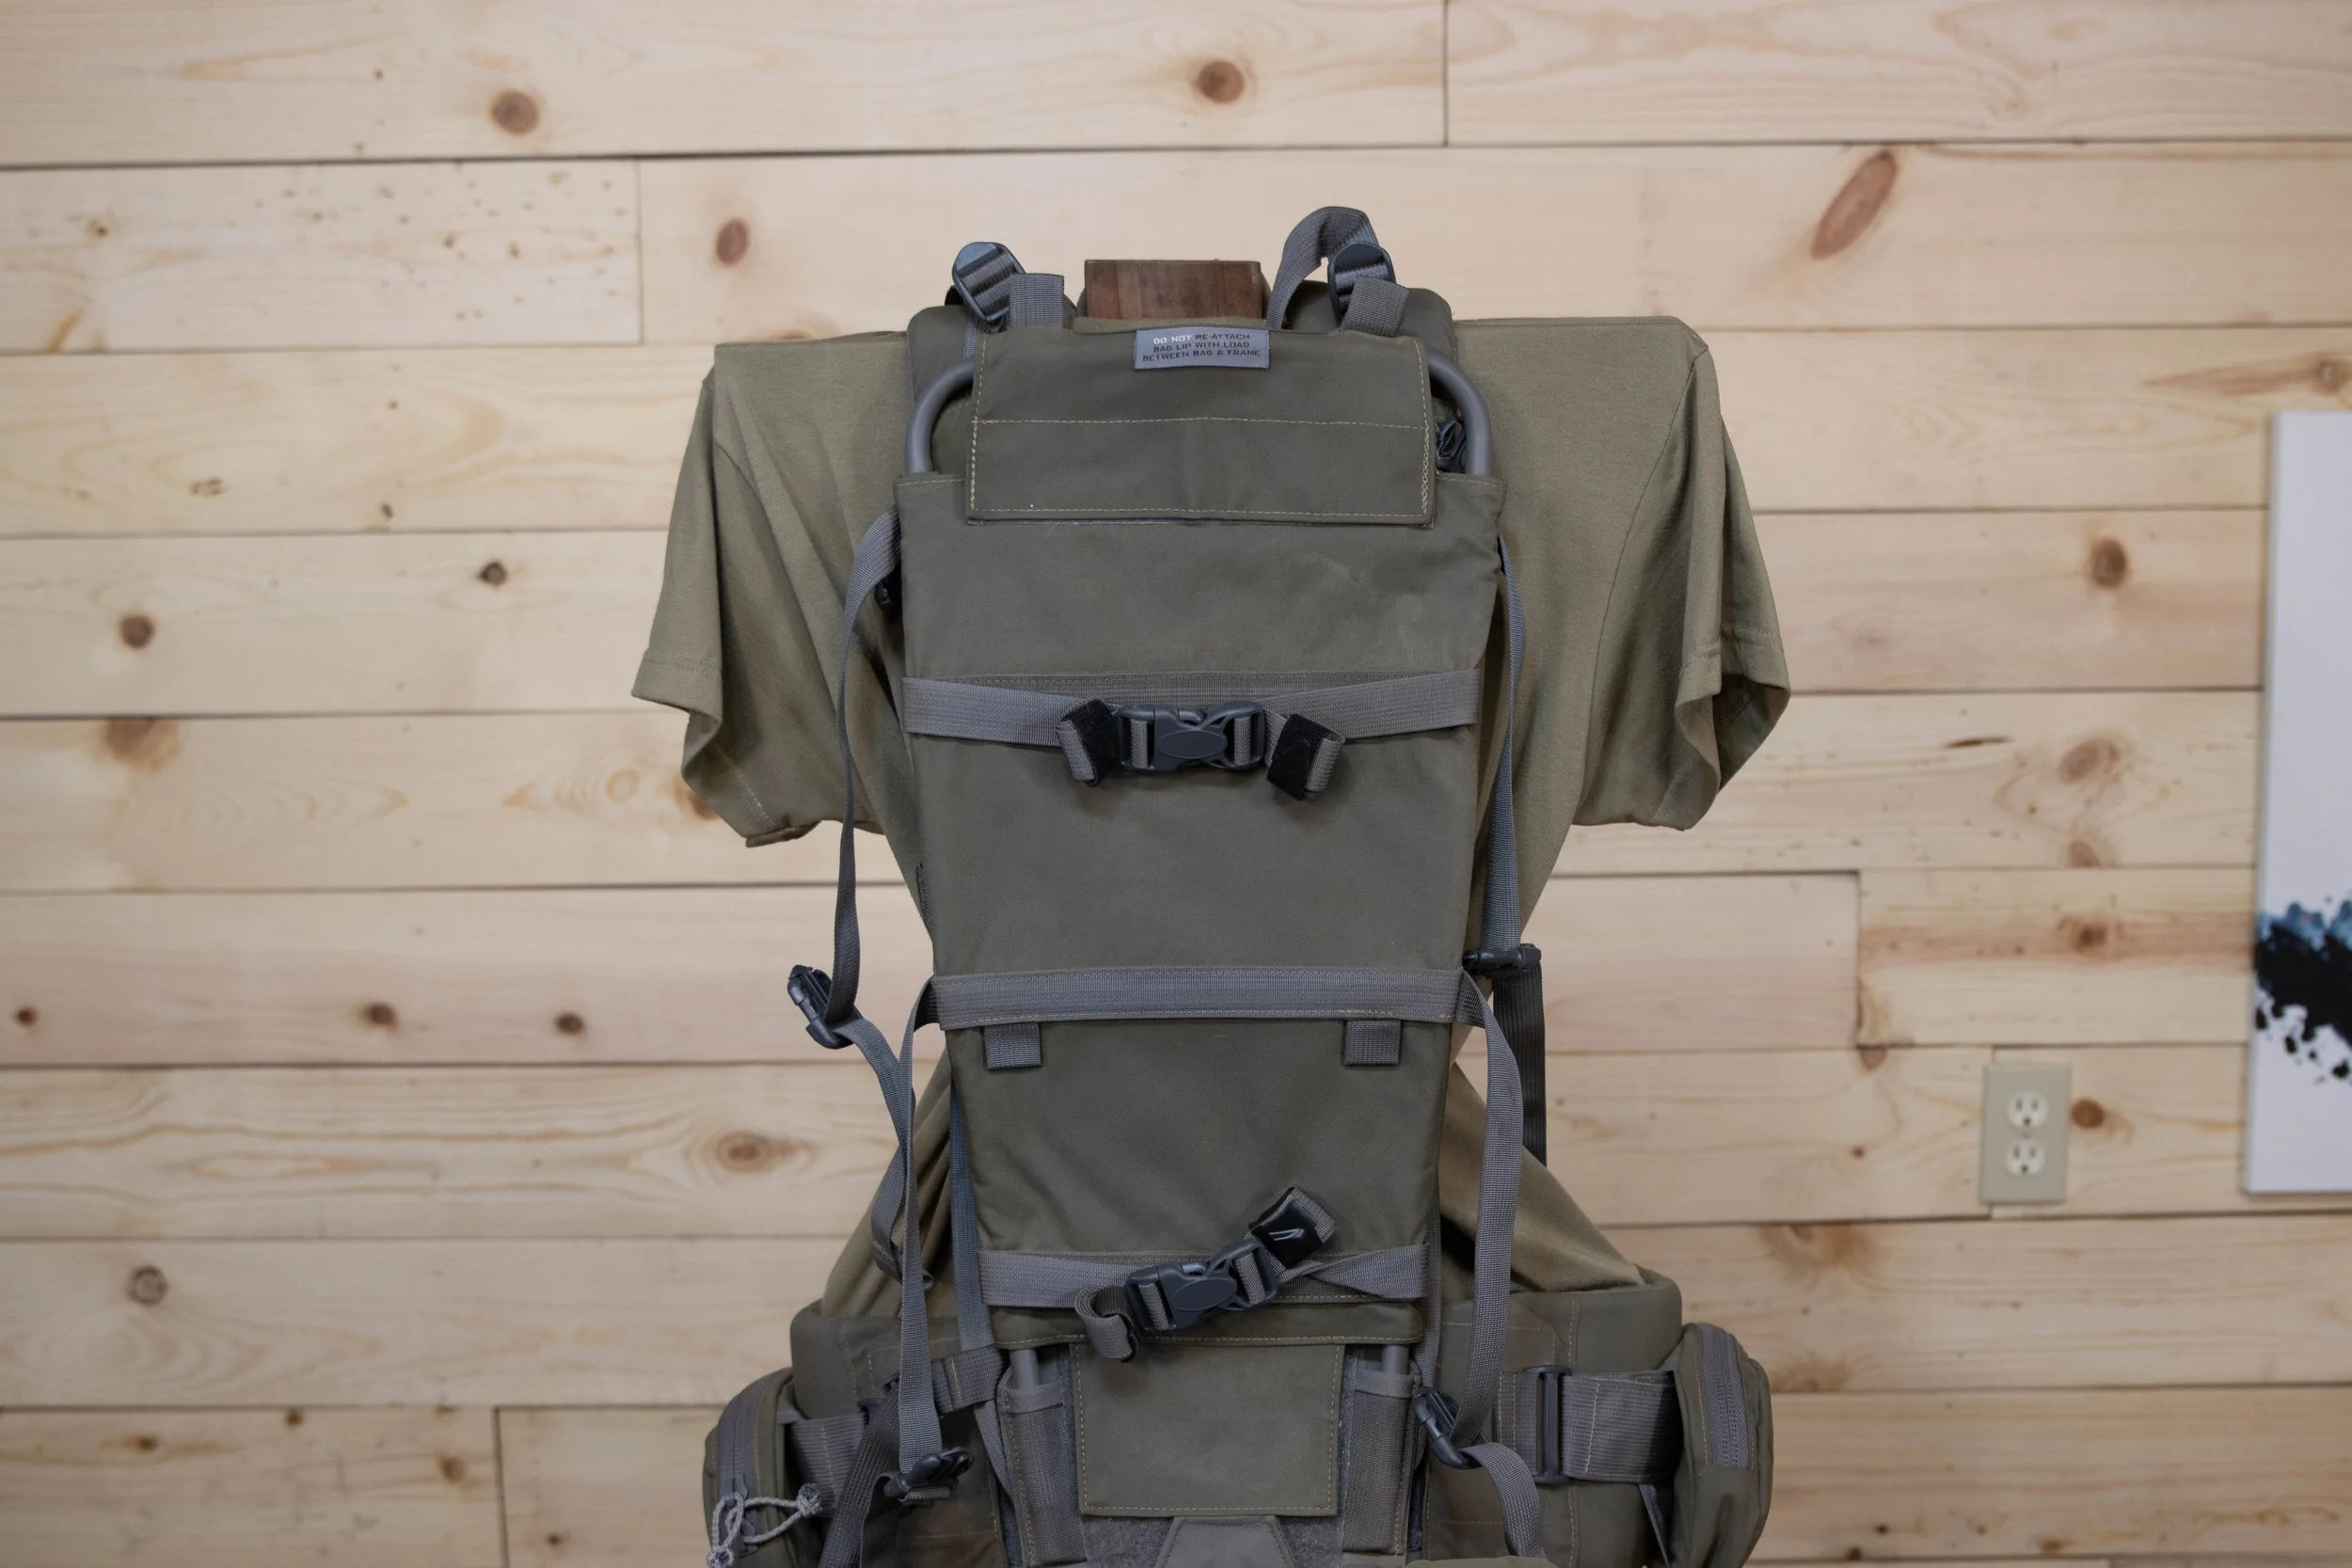
K3 Load Shelf
On the flip side, the K4 5000, introduced in March 2023, enhances K3 features with innovations that include mil-spec 500D Cordura fabric, an expansive front horseshoe zipper that encompasses nearly the entire front of the pack, large pleated side pockets replacing the less functional top-entry side pockets. Additional features include dual-compartment side mesh stretch pockets with front and side access, laser-cut MOLLE panels on the hip belt and front shoulder straps, a larger 648 cubic inch removable lid, a waterproof zip pocket located at the top of the horseshoe zippered access point, as well as a streamlined selection of new K4 accessories, including the Garmin Mini InReach holder, Insulated Nalgene holder, and the K4 quick-release rifle carrier, to name a few. These improvements contribute to the K4's enhanced functionality and organizational capabilities over the K3.

K4 5000 horseshoe zippered access.
Section 2: Capacity and Dimensions
Originally designed for a 5-to-7-day expedition, the K3 4800 often left me wishing for a bit more space. Nevertheless, it consistently delivered all the necessary gear to my destination. Boasting a capacious 4,805 cubic inches without the lid or 5,205 cubic inches with the lid, the K3 can be expanded to dimensions of 12" x 32" x 10.5" or compressed down to 3” x 11.5” x 25”. This adaptability allows for seamless adjustments to various scenarios in the field. Crafted from durable 500D Cordura, the K3 strikes a balance between robustness and weight at a total of 5lb 10oz, encompassing the bag, frame, and lid. For a day pack configuration, the bag can be compressed, and the lid removed, resulting in a slimmer profile weighing a mere 5lb 3oz. The frame, featuring continuous titanium stays, provides structural integrity capable of handling loads exceeding 250 pounds, although such weight capacity may surpass practical needs. Personally, I have successfully carried 120-pound loads over 3+ miles with minimal issues, experiencing only minor sagging and rubbing. The K3 pack also supports a variety of Exo K3 Pack Accessories.
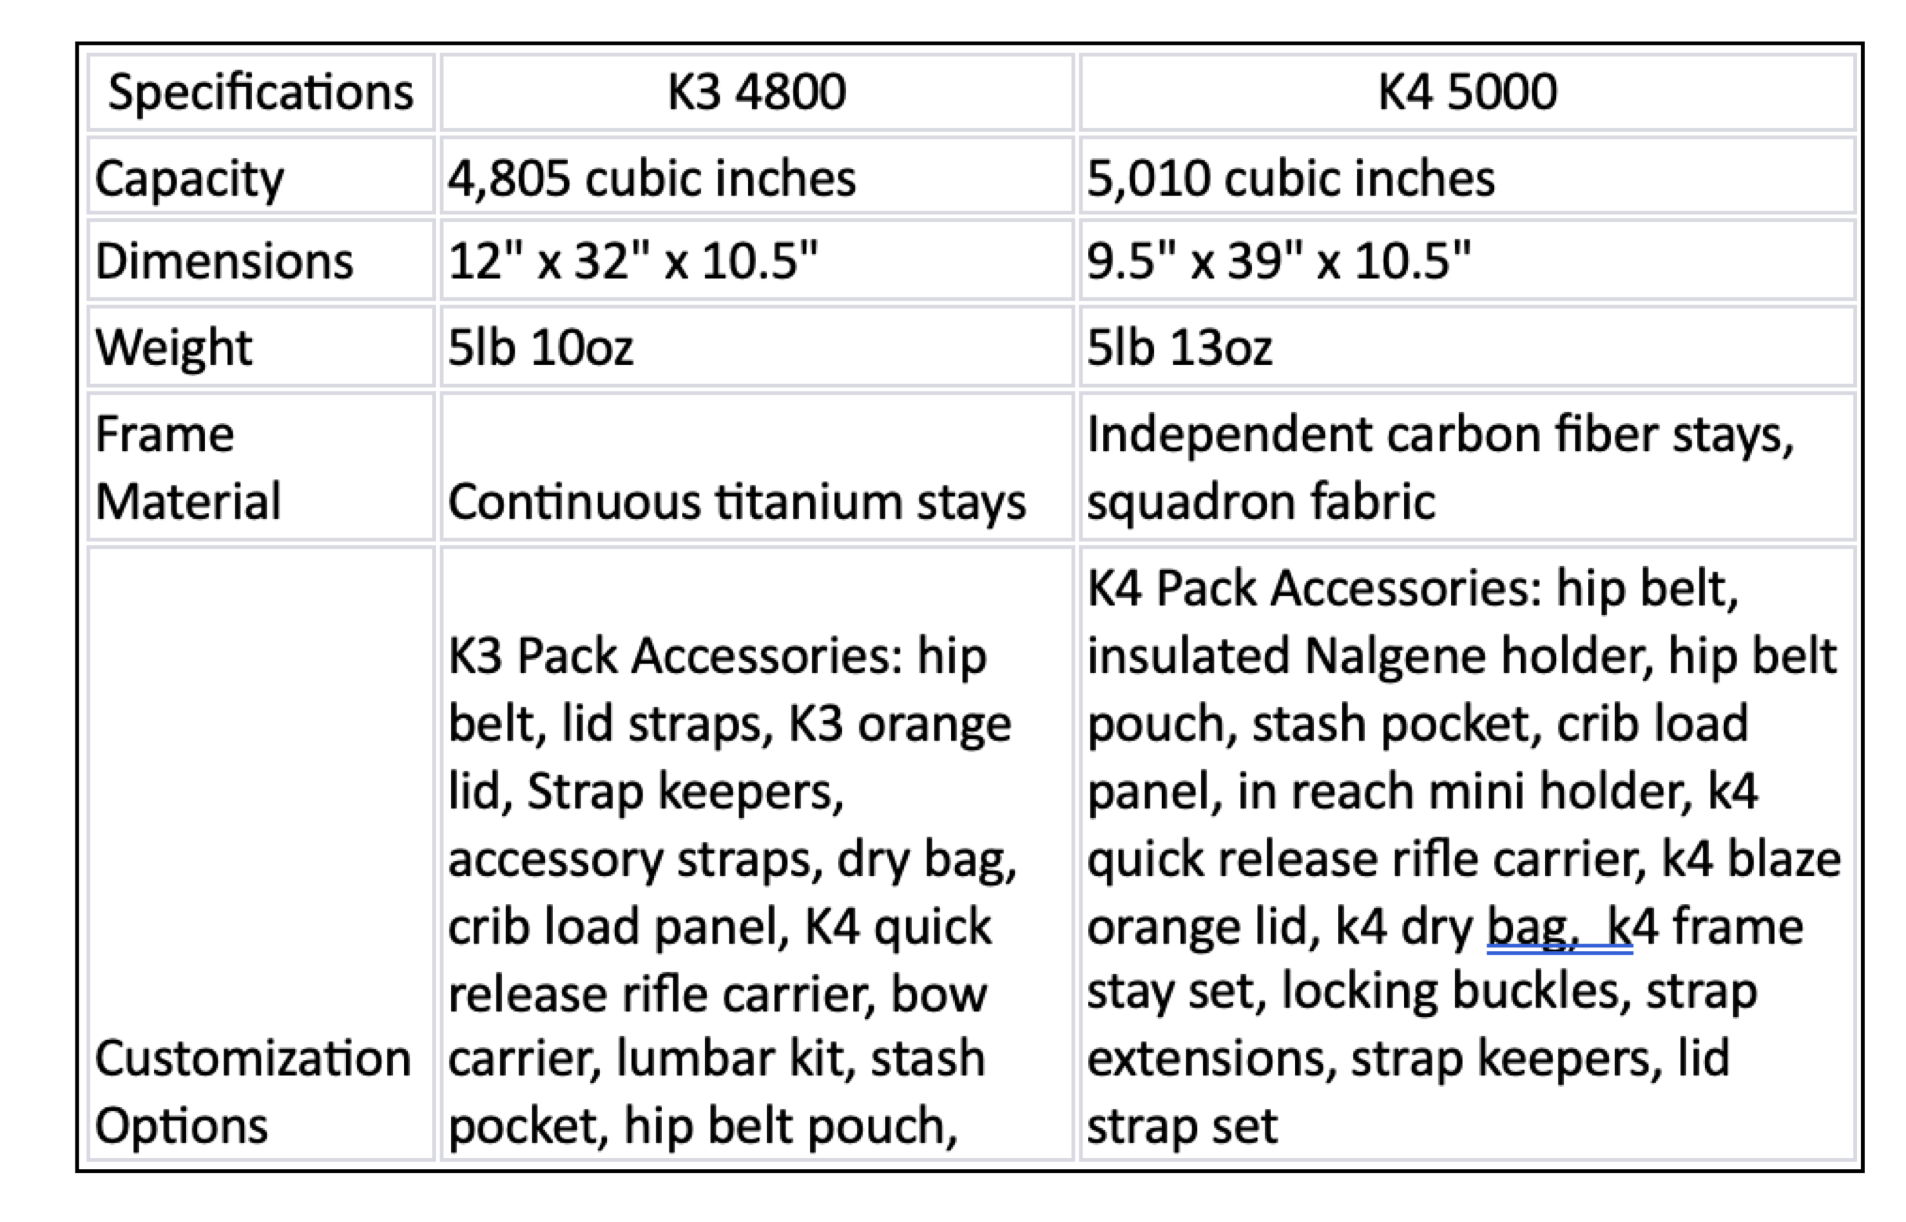
In contrast, the K4 5000 is designed with a more streamlined and slimmer profile, offering a larger capacity at 5,010 cubic inches and streamlined dimensions of 9.5" x 39" x 10.5". The pack boasts an additional 648 cubic inches with the lid, providing a total of 5,658 cubic inches to work with. Upgraded to MIL-SPEC 500D Cordura, the K4's frame utilizes Squadron fabric, a 1,000D Cordura laminated down to 500D Cordura, enhancing durability and strength in the field. The frame incorporates independent carbon fiber stays, contributing to overall durability, flexibility, and comfort. Weighing 5lb 5oz with just the frame in the bag and 5lb 13oz with the frame and lid, the K4 maintains a balanced weight and is more feature rich than the K3. Newly integrated MOLLE panels in the frame's hip belt and shoulder straps support purpose-built K4 Pack Accessories, optimizing functionality without unnecessary complexity. The pack is also compatible with MOLLE accessories from other manufacturers. A notable feature is the K4 insulated Nalgene holder, specifically designed for easy access and attachment at an angle that allows for easy access to your water. With its 3-inch plastic support, the design also prevents sagging ingeniously accommodating a 32 oz Nalgene with no issues.
Section 3: Access and Functionality

Accessing the K3 4800 involves a roll-top design, allowing adjustment for various volumes based on your food and supply requirements. This design not only shields your dry goods from the elements but also ensures durability and simplicity for the user. The pack features front horseshoe zippered access, providing additional entry points, though the size of the access point limits functionality. The front entry could benefit from increased dimensions, as accessing certain items in the pack can be challenging depending on their placement. The horseshoe zippered compartment is accompanied by a front-facing zipped mesh pocket and a stash pocket-sized zip compartment located on the back of the zippered access towards the top. Accessing the load shelf involves undoing the four compression straps (two on each side) and the Velcro attached to the top of the carbon fiber frame. One minor issue arises when reattaching the bag in an upright position, as there's nothing to hold the bag in place during the Velcroing process, leading to a gravitational struggle. Despite this minor inconvenience and the occasional slippage, the pack's load-hauling capabilities are remarkably efficient, and in particular are appreciated for meat hauling.

The K4 builds upon the K3's access design, introducing greater versatility with a large horseshoe zippered access point that nearly covers the entire front of the bag. The front-facing zippered stretch pocket has been enlarged and improved, accommodating larger items even when the pack is full. The stash pocket-sized mesh zip pocket located on the back of the horseshoe zippered access has also been upgraded, replacing the mesh with a waterproof lining. Additionally, the K4 provides top entry via roll-top access. The expanded detachable lid offers 648 cubic inches of storage, enhancing organization and access. Accessing the load shelf involves unclipping the four compression straps, with the bag now supported by independent carbon fiber stays. These stays slide into each side of the bag, providing support during the process of Velcroing the bag back onto the meat shelf. Overall, the functionality, usability, and access of the K4 surpass those of the K3.
Section 4: Frame Material

In the realm of frame construction, the K3 4800 stands out proudly with its robust framework featuring continuous titanium stays, offering a modest 1.5 inches of adjustability. The adjustment process involves extracting a 2-inch titanium stay from the bottom of the frame, flipping it upside down, and seamlessly reinserting it. Crafted from durable 500D Cordura, the frame ensures strength and durability. While undeniably sturdy, the continuous horseshoe-style frame on the K3 lacks the same degree of flex then the K4 frame.
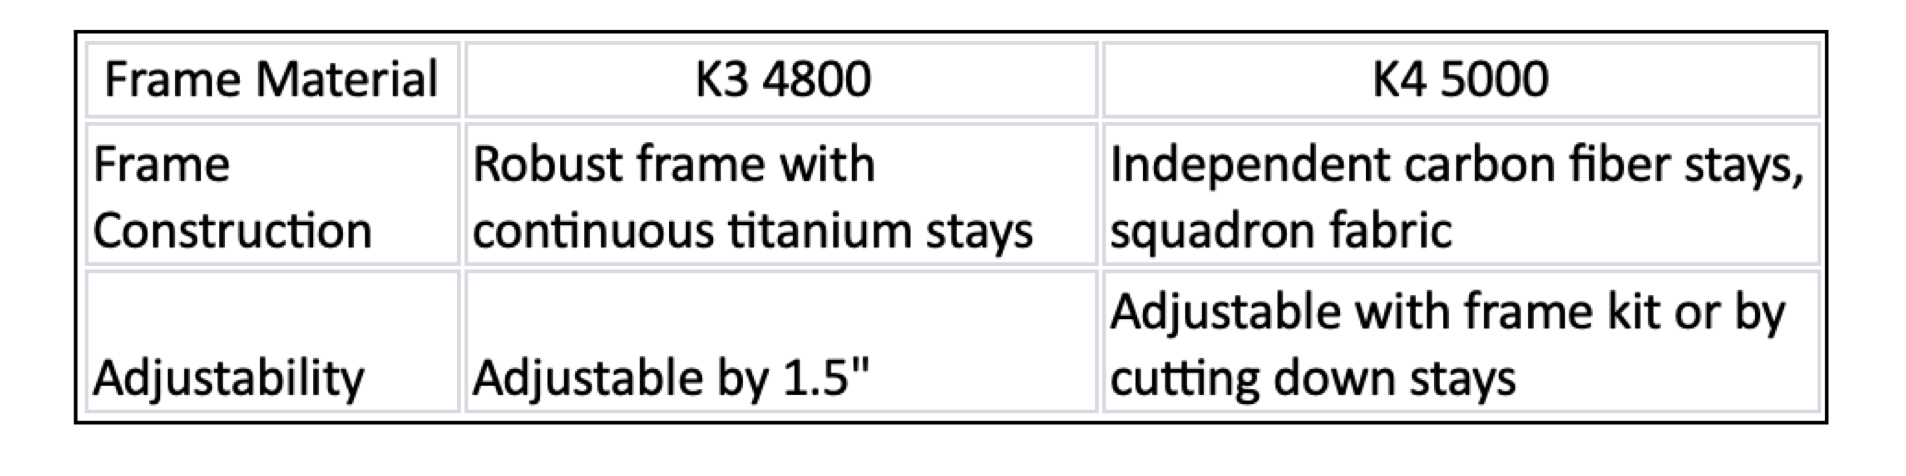
Turning our attention to the K4, a revolutionary frame system takes center stage. Independent carbon fiber stays redefine the game, offering a perfect blend of rigidity and flexibility that makes the pack feel like an extension of your movements, even under substantial loads. Complementing this design, three independent carbon fiber stays run horizontally between the two vertical stays, fortifying the pack's weight-bearing capabilities and guaranteeing you can haul even the heaviest loads, with a remarkable rating of 150+ pounds. The K4's frame design once again prioritizes user mobility. While the frame itself isn't adjustable, it can be resized to specific needs through modifications, either via a frame kit or by trimming down existing stays. Constructed with squadron fabric—a 1000D Cordura laminated down to 500D—the frame gains enhanced strength and rigidity. Notably, this fabric facilitates the innovative shoulder strap adjustment design, eliminating the need for Velcro and allowing for seamless and personalized adjustments of up to 6 inches. Personally, I greatly appreciate this new frame design, as I've discovered that previously simple tasks, such as adjusting your pack and accessing the load shelf, are now even simpler and more user-friendly.

Section 5: Price and Value
K3 4800: Although discontinued, the K3 4800 may still be available through specific channels or found used online, potentially offering a budget-friendly choice. Accessories for the K3 4800 are still available on the Exo Mountain Gear website. So, if you are thinking about upgrading your pack to an exo, but if you don’t want to spend 700+ dollars plus the cost of accessories on a brand new k4 but you still want the reliability and comfort of an exo, than this might be a more budget friendly option for you.
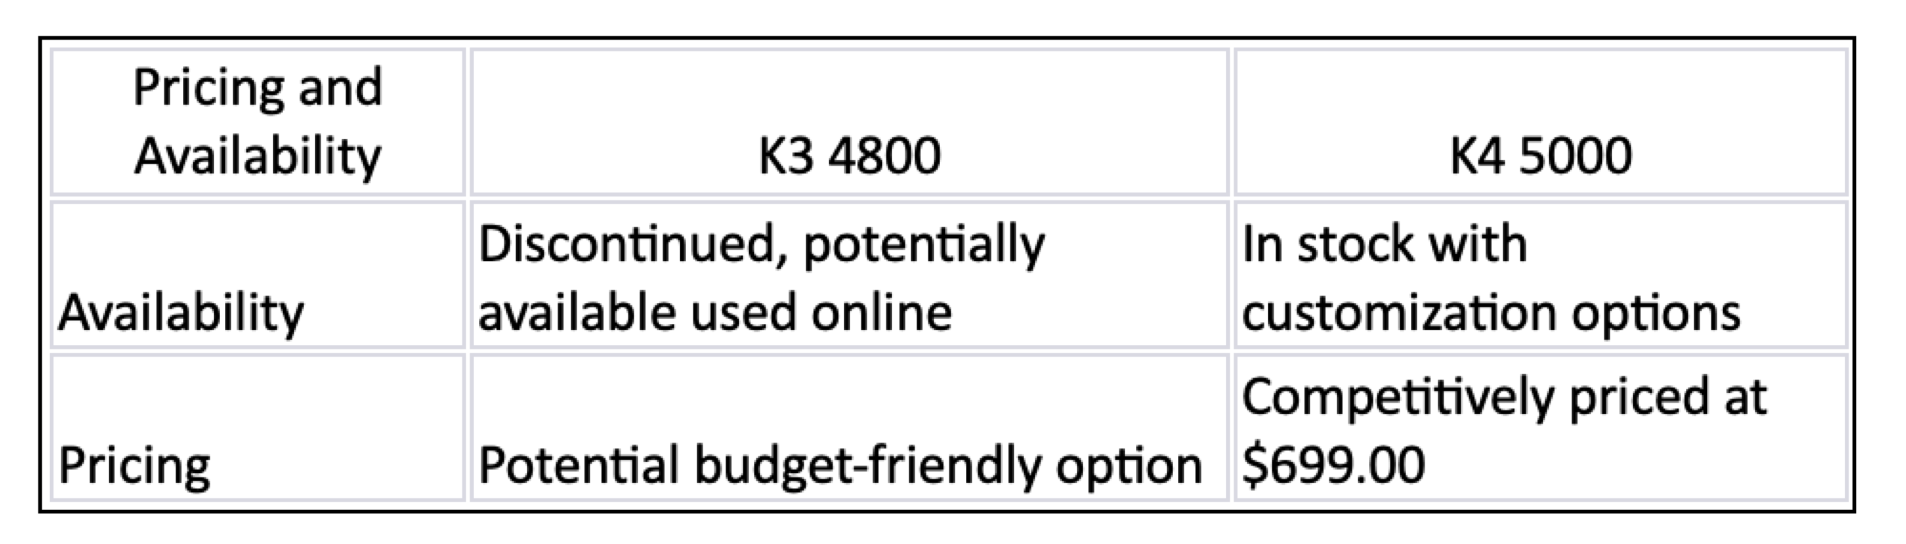
K4 5000: Competitively priced with other packs in its class at $699.00, the K4 5000 aligns with its advanced design and functionality of this new modern backpack hunting era. The pack is currently in stock with multiple customization options available instore or online. The cost of the pack with the nalogene holder and the hip belt pocket comes out to be $766 dollars plus the local sales tax for your area. For me the price is worth the money with this pack and if you have the extra money to spend, I would recommend that you opt for the K4 as it is more feature rich, has more organization capabilities and is an overall more comfortable pack out in the field.
Section 6: Additional Features
While the K3 is undeniably feature-rich for its time in production, it lacks certain elements that would grant it the versatility and functionality seen in the K4. Despite not having the newer features of the K4, the K3 frame does allow for easy adjustment and the frame height can be adjusted out in the field within minutes. This added feature, enables you to make the pack shorter or taller, and can be a valuable asset that ensures preparedness for any heavy load scenario that might arise. If you're in search of a reliable pack that empowers you to push your limits in the backcountry and carry substantial loads, the K3 is a solid choice.

K3 4800 adjustable frame stays
On the flip side, the K4 has undergone meticulous design refinement over the past 5 years, with a strong emphasis on accessory compatibility and comfort. The introduction of new MOLLE webbing not only facilitates the seamless integration of Exo K4 accessories but also offers the flexibility to include accessories from other manufacturers. Additionally, the inclusion of the new insulated Nalgene holder proved to be a game-changer for me in the field. No longer did I have to lug around my Swig rig to hydrate; instead, I can effortlessly reach behind me, grab my Nalgene bottle, and take a drink on the move. This not only allowed me to shed a couple of ounces off my total pack weight but also has provided me with peace of mind, knowing I didn't have to carry a water hose to access my water supply.

K4 Nalgene holder
In my opinion, the K4 exudes a more streamlined and integrated, user-friendly accessory system. Additionally, the independent carbon fiber suspension frame strikes a balance between rigidity and flexibility, resulting in a more comfortable and responsive experience. The redesigned pack and load shelf access design further contribute to making the K4 even simpler to use. If you're seeking a pack with enhanced accessory compatibility and a comfortable, user-friendly design, the K4 stands out as the ideal choice.

Section 7: Key Features
K3 4800
· Quick-Access Load Shelf
· Water Bladder Storage Pocket
· Wet Storage Compartment
· Lid Design with Zip-Access Pockets
· Roll-Top Design
· Horseshoe-Shaped Zip Access
· Enhanced Side Stretch Pockets
· Front Stretch Pocket
· Full-Length Side Pockets
· Two frame sizes with 1.5 inches of additional adjustment (24” and 25” frames)
· Three hipbelt sizes: small, medium and large
· Continuous titanium frame
K4 5000
· Roll-Top and Efficient front Horseshoe Zip Access
· Front Zip Access mesh zip panel
· Full-Length Side Pleated zip pockets
· Side Mesh Pockets with dual top and side access
· Water proof zip pocket located on the back of horseshoe zippered entry
· Laser-Cut MOLLE Panels on hip-belt and shoulder straps
· New MOLLE style shoulder strap adjustment features
· larger Lid with larger Storage Compartments
· Water Bladder & Wet Storage compartment
· Squadron Fabric Frame (stronger and more durable)
· New frame to bag attachment system that is easier to assemble
· 4 new frame sizes 22’,23.5”, 25” and 26.5”
· 5 hip belt sizes: extra-small, small, medium, large and extra-large
· Carbon Fiber independent suspension frame
Conclusion:
In the ever-evolving landscape of backpack hunting gear, the Exo Mountain Gear K3 4800 and K4 5000 stand as milestones in a journey of continuous improvement. This comprehensive comparative analysis aimed to unravel the nuances of these two exceptional backpacks, exploring their features, capacities, frame materials, accessibility, functionality, pricing, and additional features.
The K3 4800, a workhorse with a rich history, has proven its reliability over the past five years. Despite being discontinued, it may still offer a budget-friendly option for those seeking Exo Mountain Gear quality. Its quick-access load shelf, water bladder storage pocket, and roll-top design are testament to its enduring appeal. The K3, with its continuous titanium frame, allows for on-the-fly height adjustments, showcasing versatility and reliability in the backcountry.

On the flip side, the K4 5000 emerges as a meticulously designed, feature-rich successor, reflecting the culmination of five years of refinement. The introduction of new MOLLE webbing, a larger lid, and a waterproof zip pocket enhances its organizational capabilities. The independent carbon fiber suspension frame, coupled with a new frame-to-bag attachment system, signifies a leap forward in comfort, durability, and ease of use. The K4, with its innovative features like the insulated Nalgene holder, presents a streamlined and user-friendly accessory system, providing enhanced versatility and comfort.
When considering the price and value proposition, the K4, priced competitively at $699.00, aligns with the advanced design and functionality expected in the modern backpack hunting era. The K3, while potentially available through specific channels or the used market, may offer a more budget-friendly choice.

In conclusion, both the K3 4800 and K4 5000 have their unique strengths, catering to different needs and preferences. The K3, with its proven track record and adjustable frame height, is a solid choice for those seeking reliability and cost-effectiveness. On the other hand, the K4, with its cutting-edge features, accessory compatibility, and enhanced comfort, emerges as the ideal companion for those wanting a top-tier backpack with no compromises. The choice ultimately depends on the individual's priorities, preferences, and budget, but either way, Exo Mountain Gear continues to set the standard for excellence in the realm of backpack hunting.

Exploring the Outdoors with the Nemo Osmo Hornet Elite 1-Person Tent
Embark on solo adventures with the perfect companion – the Nemo Hornet Elite OSMO 1 Person Tent! 🏕️ In this comprehensive review, we dive deep into the features and performance of this ultralight backpacking tent to help you make an informed decision for your next outdoor escapade.

When it comes to solo adventures into the great outdoors, having the right gear can make all the difference. The Nemo Osmo Hornet Elite 1-Person Tent is a top contender for solo backpackers and outdoor enthusiasts looking for a lightweight, reliable shelter. In this article, i’ll delve into the features that make this tent stand out and why I chose this tent for my solo adventures.
One of the standout features of the Nemo Osmo Hornet Elite 1-Person Tent is its ultra-lightweight design. Weighing in at just 1 pound 13 oz , this tent is a game-changer for backpackers who prioritize minimizing pack weight. The lightweight design is achieved through the use of high-quality materials and innovative engineering, making it an excellent choice for those who need to cover substantial distances on foot.
As a solo adventurer I really appreciate tents with a quick and hassle-free setup, and the Nemo Osmo Hornet Elite delivers just that. The tent features a single-pole design with a hubbed intersection for easy assembly. The color-coded setup system ensures that even novice campers can pitch the tent quickly, allowing more time to enjoy the outdoor experience.
If you want to see how easy this tent is to setup and take down then check out my video on YouTube. In this video I do a field test, assembly and full overview.
While designed for solo use, the Osmo Hornet Elite doesn't compromise on interior space. The tent provides ample room for one person to sleep comfortably and store gear. The overhead pocket and gear loft offer convenient storage options, helping to keep the interior organized and clutter-free. The tent's unique design also includes a vestibule for additional gear storage, ensuring that everything you need is within arm's reach.
Staying dry and comfortable in various weather conditions is crucial for any camper/hunter. The Nemo Osmo Hornet Elite is built with high-quality, weather-resistant materials that provide reliable protection against rain and wind. The rainfly is designed to prevent water from entering the tent, and the bathtub-style floor ensures that ground moisture is kept at bay. Ventilation is also a key consideration, with a well-designed system that minimizes condensation and keeps the interior comfortable.
The tent's construction is robust, using premium materials that contribute to its durability. The ripstop nylon fabric enhances the tent's resilience against wear and tear, making it suitable for a variety of terrains. The DAC Featherlite poles, known for their strength and lightness, add to the overall sturdiness of the tent.
In the world of solo backpacking, the Nemo Osmo Hornet Elite 1-Person Tent stands out as a reliable and well-designed shelter option. Its ultra-lightweight construction, quick setup, spacious interior, weather protection features, and durable build make it one of my favorite solo adventurer tent. If your a person who prioritize comfort and efficiency on their outdoor journeys then you should definitely take a look at this tent. Whether you're embarking on a thru-hike or a weekend getaway, the Nemo Osmo Hornet Elite is a tent that delivers on its promise of quality and performance.

Now lets check out the Pros and Cons:
Pros:
Ultralight Design: The tent's minimal weight is a significant advantage for solo backpackers who prioritize reducing pack weight for long journeys.
Quick and Easy Setup: The simple, color-coded setup system with a single-pole design allows for a fast and hassle-free assembly, making it ideal for solo adventurers on the move.
Spacious Interior: Despite being a one-person tent, the Nemo Osmo Hornet Elite offers a surprisingly roomy interior with overhead storage pockets and a gear loft, providing ample space for a comfortable night's sleep and gear organization.
Weather Protection: The tent's high-quality materials and well-designed rainfly offer reliable protection against rain and wind, while the bathtub-style floor prevents ground moisture from seeping in. The ventilation system helps minimize condensation, ensuring a dry and comfortable interior.
Durable Construction: The tent is constructed with durable ripstop nylon fabric and DAC Featherlite poles, ensuring longevity and resilience against wear and tear, making it suitable for various outdoor conditions.
Versatile Vestibule: The addition of a vestibule provides extra space for gear storage, keeping essential items easily accessible without crowding the tent's interior.
Cons:
Limited Space for Gear: While the tent provides adequate space for one person, the limited vestibule space may be insufficient for those with extra gear, especially on longer expeditions.
Single-Entrance Design: The tent features a single entrance, which may be inconvenient for campers who prefer dual entrances for enhanced accessibility and ventilation options.
Pricier Option: As a premium ultralight tent, the Nemo Osmo Hornet Elite is relatively more expensive compared to budget options. While the quality justifies the price for many users, budget-conscious campers may find it less appealing.
Less Freestanding: The tent requires staking to achieve its full structural integrity. While this is common for many backpacking tents, some users may prefer a more freestanding design for increased flexibility in choosing a campsite.
Thinner Materials: The lightweight design involves the use of thinner materials, which, while contributing to the tent's low weight, may be less forgiving in rough conditions and require careful handling to avoid damage.
In conclusion, the Nemo Osmo Hornet Elite 1-Person Tent is a top choice for solo adventurers seeking an ultralight, durable, and weather-resistant shelter. While it may have a few limitations, its overall performance and thoughtful design make it an excellent choice for those who prioritize efficiency and quality in their outdoor gear.

Exo Mountain Gear K4 5000 Unboxing and First Impressions: A Detailed Review
In the world of outdoor exploration, the right gear can mean the difference between a memorable adventure and a frustrating experience. For those who are passionate about hunting, hiking, or venturing into the untamed wilderness, a reliable backpack is nothing short of an essential companion. Enter the Exo Mountain Gear K4 Pack System, a name that resonates with those who seek ruggedness, versatility, and unparalleled performance. Join us as we embark on a journey of discovery through the unboxing of this exceptional outdoor companion. In this article, we'll not only unpack this marvel but also delve into its features, craftsmanship, and potential to elevate your outdoor escapades to a whole new level. Whether you're a seasoned backcountry explorer or a novice adventurer, the Exo Mountain Gear K4 is set to open the door to a world of exciting possibilities. So, let's unbox and explore the K4 Pack System together and see what this backpack has in store for us.

Exo Mountain Gear K4 Pack System Unboxing and Review: Your Gateway to Unparalleled Adventure
In 2017, after years of procrastination, I finally picked up a rifle and ventured into the woods. Little did I know that this would mark the beginning of a lifelong obsession. Fast forward to 2023; I'm 34 years old and have been hunting for six years. Despite the time that has passed, I still consider myself an adult-onset hunter. Hunting has become my passion, a skill that you continuously refine, never fully mastering, and that's what I love most about this age-old American pastime.
My experiences in the field have taught me that successful hunting requires patience and comfort, and I've learned the hard way that cheap gear often leads to regret. That's why I now seek out the best equipment to add to my hunting toolkit, with a particular focus on boots and a quality pack when venturing into the backcountry.
In 2020, after trying various pack systems and dealing with the challenges of transporting game with flimsy frame packs, I made a significant investment. After extensive research through YouTube videos and gear reviews, I decided to purchase a pack from Exo Mountain Gear. Initially, I bought the K3 3200, but I found it a little too small for my hunting needs in Idaho. So, I upgraded to the K3 4800, which proved to be perfect.
The K3 pack's simple yet efficient design made it possible for me to handle 100+ pound loads as if they were only 50 pounds. The K3 Spyder frame was clearly built by hunters for hunters, making it easy to navigate over obstacles in the field. The pack's streamlined and well-thought-out design allowed for quick access to my gear. My experience with the K3 pack left me a devoted fan of the Exo brand, thinking I'd never need another pack. However, in 2023, Exo introduced the K4 pack system.
Exo marketed the new K4 pack system as a ground-up redesign, with added features and increased volume to enhance efficiency and comfort. They also expanded the volume of the lid, introduced a Nalgene holder to carry the load through the frame, and re-designed the frame to accommodate various body shapes and sizes. Intrigued by these improvements and the potential for enhanced field comfort, I decided to try the new K4 pack.
Exo is a direct-to-consumer company based in Boise, Idaho. When you call their customer service, you often get the opportunity to speak with key figures in the company, such as Steve Spec, Mark Huelsing (the voice of the Hunt Backcountry Podcast), Jake Havlicek, Patrick Kelly, or Jack Reese. Their helpful and knowledgeable team has always been quick to assist me with any questions. When I called to order the K4 5000 pack system for an upcoming hunt, I was pleased to learn that they had ample stock and would deliver it in time. The pack shipped exceptionally fast; I placed my order on October 20th and received it on the 24th. Exo's swift shipping and excellent customer service have consistently impressed me, reflecting their attention to detail and genuine care for customers.
First Impressions and Overview:
The packaging of the K4 5000 pack system was simple and efficient, in line with my expectations from Exo. Inside the box, I found my K4 5000 pack system, Nalgene holder, hip belt pouch, locking buckles, quick-release rifle carrier, Garmin inReach holder, strap extensions, receipt, and a setup and use instructional guide.
Holding the K4 pack in my hands, I was immediately impressed by its build and quality. The new frame felt robust yet flexible, thanks to the incorporation of carbon fiber stays. These carbon fiber stays, available in four different sizes depending on your height, help the frame maintain its shape and prevent it from bending under heavy loads. Additionally, three horizontal carbon fiber stays were strategically placed to prevent "barreling," a common issue when securing heavy loads. The frame is adjustable by up to 6 inches for a custom fit and is constructed with a heavy-duty fabric called Squadron, providing extra strength and durability.
The hip belt has been designed to fit various body shapes and sizes and is available in five different sizes. The foams used inside the lumbar pad, hip belt, and shoulder harness are highly durable closed-cell foams, ensuring long-term comfort and performance. The hip belt also features two Molly panels for use with Exo's K4 accessories, allowing for customization. Molly panels on the shoulder straps are designed for in-reach holders and other forthcoming accessories.
The Nalgene holder is angled for easy access, and the frame itself supports the weight of the Nalgene and water, achieved by integrating three inches of plastic into the frame.
The hardware used for the pack is durable and nearly indestructible, made by YKK and Duraflex. While the pack comes with one set of locking buckles, you have the option to replace all the non-stitched buckles with locking buckles. Each set of locking buckles adds approximately 1 ounce.
Moving on to the pack itself, you'll notice several similarities to the K3 4800 bag, along with some notable upgrades. Exo packs are constructed with USA-made Cordura that is fully Berry Compliant and meets MIL-SPEC DTL-32439B standards, ensuring durability and resistance to fading from UV exposure and color abrasion. The Cordura is backed with a PU coating and treated with a Class 3 DWR finish, providing excellent water resistance.
The K4 features a Horse shoe zipper for easy top access, a feature now available on all models. Additionally, it has a front mesh zippered pocket with stretch and flexibility to accommodate gear of various shapes and sizes. On the back of the horse shoe zippered entry, there's a small waterproof zip pocket for storing essential items.
The side stretch pockets of the K3 4800 have been replaced with two large pleated zipper pockets, capable of holding larger items like a BTX spotting scope with a 90 mm objective lens. These pockets are highly abrasion-resistant and versatile for different types of gear.
The pack also includes a waterproof zipper compartment that runs the length of the pack on the back, ideal for wet gear or containing any potential water leaks, ensuring your gear remains dry.
Another significant improvement in the K4 pack is the larger K4 lid, which offers an additional 648 cubic inches of space compared to the K3 lid. This extra space enhances practicality and allows for better gear organization.
In summary, the new K4 pack system, including the pack, frame, and lid, weighs 5lb, 13oz and has a total capacity of 5,658 cubic inches. If you wish to reduce weight, you have the option to use the bag without the lid, which weighs a total of 5lb, 5oz. The K4 pack seems to be the ideal size for my style of hunting, with added features and rugged construction. While the K3 is an excellent pack, the K4 offers even more features and durability.
If you liked this article and want more detail then check out my K4 video. The link is below .

Breaking Down Binoculars: What You Need to Know and What Terms Really Matter
If you're in to optics and want to become more informed then check out this article. I cover the basic terminology and really give you the tools and info you need to know and understand when selecting a pair of binoculars.

A variety of Different Binocular selections
With the accessibility of knowledge so readily available at our fingertips these days, it is often easy to find yourself in a rabbit hole of research when making purchase decisions and looking for new gear. There is so much information out there and so many products on the market that the process of making a purchase can often feel daunting and almost impossible. As a nature enthusiast, western hunter, birder, and all-around outdoors man, I find myself in a constant quest to find the next best piece of gear. I seem to always be looking for something that will make my life easier in the field, on hikes, and in my everyday outdoor pursuits. For me, one of the biggest purchasing decisions I have made (and have been making) over the past nine years has been trying to find and purchase the perfect pair of binoculars.
I’ll admit, the journey has not been easy and after years and years of online research, hard-earned money spent, and constant trial and error, I am still figuring it out. As such, this article has been written to help you make a confident and educated decision when purchasing your next pair of optics. In this article, we will break down the terminology and dive deep into the things that actually matter when purchasing optics.
First off, one of the most important things that you need to understand when purchasing a pair of optics is the terminology that is used by the manufacturer. Terms like: Diopter, Angular Field of View (AFOV), exit pupil, field of view (FOV), depth of field, Twilight factor, and eye relief. These are all terms that help break down a binocular. And yes, they sound really cool, but what do they actually mean? Better yet, how do these things help you in the field and how are they applied to a good piece of glass? Now before I dive deep into the terms, the first thing that I want you to consider when purchasing a quality pair of binoculars is your use for them.
Do you plan on using them in low light conditions such as early morning or late at night? Do you plan on only using them during the day? Or do you actually just want to have a pair to throw in your truck to use on occasion? Your use for a pair of binoculars is going to be a huge determining factor to consider when making your purchasing decision. Keep in mind that this article is not meant to sell you on a specific brand, but instead help you break down the terminology so that you can make an informed and educated decision when you start the buying process. So now that we have gone over all of that, let’s get in to the meaning behind the terminology.

the exit pupil in full view
In the world of optics, the exit pupil is an important term to understand. The exit pupil is a virtual aperture in an optical piece of glass. What is an aperture you say? Well in layman’s terms, an aperture is essentially a hole, gap or opening that lets light through. But more specifically, it is space through which light passes in an optical instrument. On a pair of binoculars, the exit pupil is seen as a bright circle in the center of each eyepiece. You can see this circle when you hold a pair of binoculars towards the light at arm’s length from your eyes. Another way that you can see an exit people is by completing the following steps:
Fully retract the eye cups and focus the binoculars in a bright location.
Hold a white card up to the eyepiece of your objective lenses.
This will in turn project a disc of light onto the card that you are holding.
Once you see the disc of light, move the card closer to or further away from the eyepiece until you get the smallest possible disc diameter on the card.
This diameter is the actual diameter of the exit pupil.
Keep in mind that when viewing the exit pupil in a pair of binoculars, the disc should always be round and uniform in brightness. If shadows are visible, this could be an indication of poor workmanship.

So now that we have gone over what an exit pupil is and how to find it. The next thing that you are probably wondering is why is it important. Well, the exit pupil is important because it allows light to pass through your binoculars and into your eyes. So, in theory, a smaller exit pupil allows less light in and a larger exit pupil will deliver more light to your eyes. This can be an important factor to consider when comparing binoculars, especially when you are considering using them in poor light conditions such as dawn or dusk. But wait there is more, before you run to the store and buy a pair of binoculars with the largest exit pupil you need to consider a few other factors.
First off, the human eye varies in diameter based on the current viewing conditions. In normal daylight conditions the average human eye opens from 2 mm to 4 mm, and in dark and poor light conditions the maximum pupil size of a human eye is typically between 5 mm to 9 mm; depending on a person’s age.
To make it even more complicated, your pupil size will actually decrease in size slowly as you grow older, but on average, a person 25 years of age or younger usually has a pupil size of 7 mm in low light conditions.
So now that we understand that the human eye’s pupil size varies depending on conditions, let’s take a look at some practical examples to help us better understand how, why, and when these things matter. For example, if you take a pair of 8X56 binoculars you can calculate the exit pupil with a simple formula.
56/8 = 7.0 mm
So, based on this calculation, if you use a pair of 8x56 binoculars in bright conditions, and your eye pupil diameter is only 2 to 4 mms, then over half the light is being blocked by the retina in your eye. However, despite this loss of light, the emergent light still fills the pupil and subsequently there is no loss of light between your eye and the optic. Similarly, if you are using a pair of 10X25 binoculars the diameter of the exit pupil would be 2.5 mm. This means that the exit pupil in normal light conditions is about the same size as the normal pupil of your human eye. The result is an image that fills the human eye with light. So, in effect, the smaller binoculars would seem just as bright as a pair of 8x56 binoculars. This means that in normal daylight conditions you can get away with a smaller pair of binoculars because the human eye is essentially the same size as the exit pupil of a smaller pair of binoculars. We have now covered normal light conditions, let’s take a look at a similar scenario, but in low light conditions.
In low light conditions the 8x56 pair of binoculars will have a 7.0 mm exit pupil and the human eye will also have an exit pupil of around 5 mm to 7 mm. So, in this instance, the human eye is about the same size as the exit pupil of the binocular and therefore no loss of brightness is observed. The result is an image that is just as bright as if you were to see that image with your naked eye.
In contrast, the smaller 10x25 binoculars will not let as much light in because the exit pupil of the optic is smaller than the 7 mm human pupil. This results in an image that is darker than what you would see with your human eye. From these examples you can see that in normal light conditions you can get away with almost any size binocular, but in low light conditions you want a larger binocular with a larger exit pupil. Thus, the ideal exit pupil diameter that you need will depend on your specific need for that optic. In particular, if you are a hunter, or someone who likes getting up in the early morning or late evening to view wild life, you are probably going to want to look at an optic with a larger exit pupil. While on the other hand most compact binoculars are going to be plenty sufficient for daytime use. Wow that was a lot of information… but wait we still have more…next let’s take a look at depth of field.

The Depth of field of a binocular or spotting scope is the distance from “near to far” that is in focus at a certain setting of the focus adjustment wheel or at a certain distance. Moreover, the depth of field decreases as the magnification increases, and at high magnifications the depth of field can be very shallow and precise focusing becomes critical. As such, the size, action, and feel of the focusing wheel or knob can be another important factor to consider when purchasing an optic especially when glassing free hand or without a tripod. Although depth of field is not the most important term to consider, it is still worth mentioning and something that you should consider when making a purchase. So now that we have covered depth of field let’s take a look at the term Field of View (FOV) and its importance in the world of optics.
In essence, Field of view (FOV) is the horizontal width of the image you can see while looking through a pair of binoculars at distance. In my opinion, field of view is one of the most important aspects for detecting critters in the early morning and late evenings. Having a large FOV allows you to pick up more movement on a hillside. This is due to the simple fact that you can see more out of the objective when looking through it.
Thus, when buying a pair of optics, you will want to consider the field-of-view when making your selection. In particular you will want to look at each particular make and model, as each model is constructed differently and will thus have different FOV even though their magnification ratings are the same. Often when reviewing the manufactures specifications, the FOV will be represented by the number of feet per one thousand yards of distance. This term is known as linear field of view. You will also see in the manufactures specifications two other types of FOV and these are the Real field of view (RFOV), and the Angular Field-of-view (AFOV).
Real field of view or degrees field of view is measured from the center of the objective lens and expressed in degrees. When referring to RFOV, the lower the magnification the binoculars have, the wider the real field of view and the higher the magnification, the narrower the field of view. On the other hand, Angular or Apparent field of view (AFOV) is the angle at which your eye would move through the binocular, if you were to look at one edge and then scanned over to the opposite edge. You can calculate the AFOV by taking the value of the RFOV and then multiplying that by the magnification.
For instance, if you had a pair of 10 power binoculars that have a 5 Degree field of view the apparent field of view would be 50 degrees. This value represents the field of view that you would see while looking through the binoculars. In general, and apparent field of view of 62 degrees or more is considered a wide field of view. So do you understand FOV now or does it at least make more sense? I hope so because we are now going to move on to the optical term Diopter.
The Diopter is a unit of measurement of the optical power of a lens. It is equal to the reciprocal of the focal length measured in meters (1/meters) and is therefore a unit of reciprocal length. Meaning a 4- diopter lens brings parallel rays of light to focus at ¼ meter. Basically, all this means is that the diopter measurement is used to help correct the image and help with clarity. The diopter is usually adjusted using a separate eyepiece-focusing tools called a Diopter Adjuster. The diopter adjuster is usually located on the right side of your binoculars and plays an important role in correcting the focus of your binoculars to your eyes. The term used to describe this adjustment is Dioptric correction, which is the adjustment of one lens to provide compatible focus when the viewers eyes have different capabilities. Adjusting this results in less strain on the eyes and allows for optimal viewing performance in the field. Ok so we have now covered a plethora of terms and we still have a few more to go…so saddle up and let’s get to it. The next terms that we are going to cover are directly related. They are eye cups and eye relief.

Eye cups essentially are used to help keep the distance from the ocular lens to one’s eyes and they can also help keep stray light away from one’s eyes while using binoculars. Almost all eye cups are rubberized and there are usually three types of eyecups in the world of optics: eye cups that roll, eye cups that slide, and twist up eye cups known as helicoid eyecups. The rubberized rolling eye cups tend to break from the constant rolling and are probably the cheapest option that you can find. The sliding eye cups are better quality but they can be hard to keep in place. Lastly, the twist up eye cups, are probably the best option because they can be left in any position from all the way down to all the way up. They are the best option to choose because they often have click stops at regular interludes. This allows you to get the best eye relief for your vision and can relieve strain on your eyes during long periods of glassing. Now that we have covered eye cups, lets dive into eye relief.

Note that if you do not wear glasses, you can skip the below section on eye relief; none of this will matter for you. Binoculars with long or short eye relief will work just fine for any person who does not wear glasses. If the binocular has long eye relief, the eye cups can be extended to hold the eyes the correct distance from the eyepiece. With that being said, if you do wear glasses you will want to read the section below on eye relief.
Eye relief is the distance between the ocular lens and the eye at which the eye can obtain the full viewing angle. This basically means that it is the distance at which an optical instrument can be held from the eye and the full field of view can still be observed. Generally speaking, the higher the magnification of the optic the larger the intended field of view, the shorter the eye relief will be.
In particular, eye relief is import for eye glass wearers because their eyes are typically further from the eye piece, and thus, a longer eye relief is often needed to see the entire field of view through a pair of binoculars. So, if you wear glasses, you will want to focus on binoculars with long eye relief, this will give your glasses the room that they need to get closer to the eye pieces of the binocular. In general, most glasses wearers need binoculars with a minimum of about 16 mm of eye relief. However, exactly how much eye relief one needs, depends on their glasses and their face structure.
For instance, if your glasses are small and they ride close to your eyes, you might get away with a binocular that has an eye relief of only 15 mm. However, most glasses wearers, need longer eye relief than that. To determine what eye relief you need, first try the binoculars with your glasses. Look through it with your glasses on and then with your glasses off. Do not worry if you can’t focus the binoculars without your glasses. What you are trying to determine is whether the image includes everything with your glasses on that you can see with your glasses off and that is how you will determine if the binoculars will have the correct eye relief for you.
Wow, if you have made it this far you will be happy to know that we are almost finished. The next term we will cover in this article is focal length, so here goes nothing.
The focal length of an optical system is a measure of how strongly the system converges or diverges light. For an optical system in air, it is the distance over which paralleled rays are brought to a focus. A system with a shorter focal length has greater optical power (not to be confused with magnification) than one with a long focal length; that is, it bends the rays more strongly, bringing them to a focus in a shorter distance. In general optics with a shorter focal length are better for viewing larger distances. Shorter focal lengths not only capture a wider view, but they also have a deeper depth of field. They can capture almost everything from right in front of the lens to infinity in acceptable focus. So, when you are making a purchase decision, definitely take focal length into consideration. The last term that I want to cover in this article is twilight factor.

In essence the twilight factor is a formula used to determine a binoculars performance in twilight. A binoculars twilight factor was more important in the past, before modern optical coatings were invented, but even so, it is still worth mentioning. In a modern binocular, the performance in poor light now depends more on the quality of the glass and optical coatings than on just the twilight factor formula. Good coatings can double the amount of light that moves through a binocular when compared to those that have poor quality coatings. Twilight factor is the most useful rating for low light performance. The higher the twilight factor is, the smaller details we can see at dusk. The twilight factor alone does not permit any kind of real statement. A correspondingly large exit pupil is always decisive and important for twilight use. Ideally, it should be at least as large as the pupil of the user. Anything with an exit pupil smaller than 4 mm is usually not suitable for viewing in low light conditions. And with that we have come to the end of our optical journey.

Simply put, you can’t pick a quality pair of binoculars out if you do not understand what makes a binocular quality. Often times the terminology and definitions used by optical manufactures can be vague and hard to understand. To better understand what you are looking for in a quality piece of glass you must first understand the meanings behind the terms and specifications associated with those products. To gain a better understanding of this, we described and looked at some of the most import terms and definitions to consider when purchasing a quality pair of binoculars. Ultimately, Knowledge is always power, and you now have the power to make well-informed decision. Hopefully, this article will prevent you from making the same rooky mistakes that I made in the past when purchasing glass.
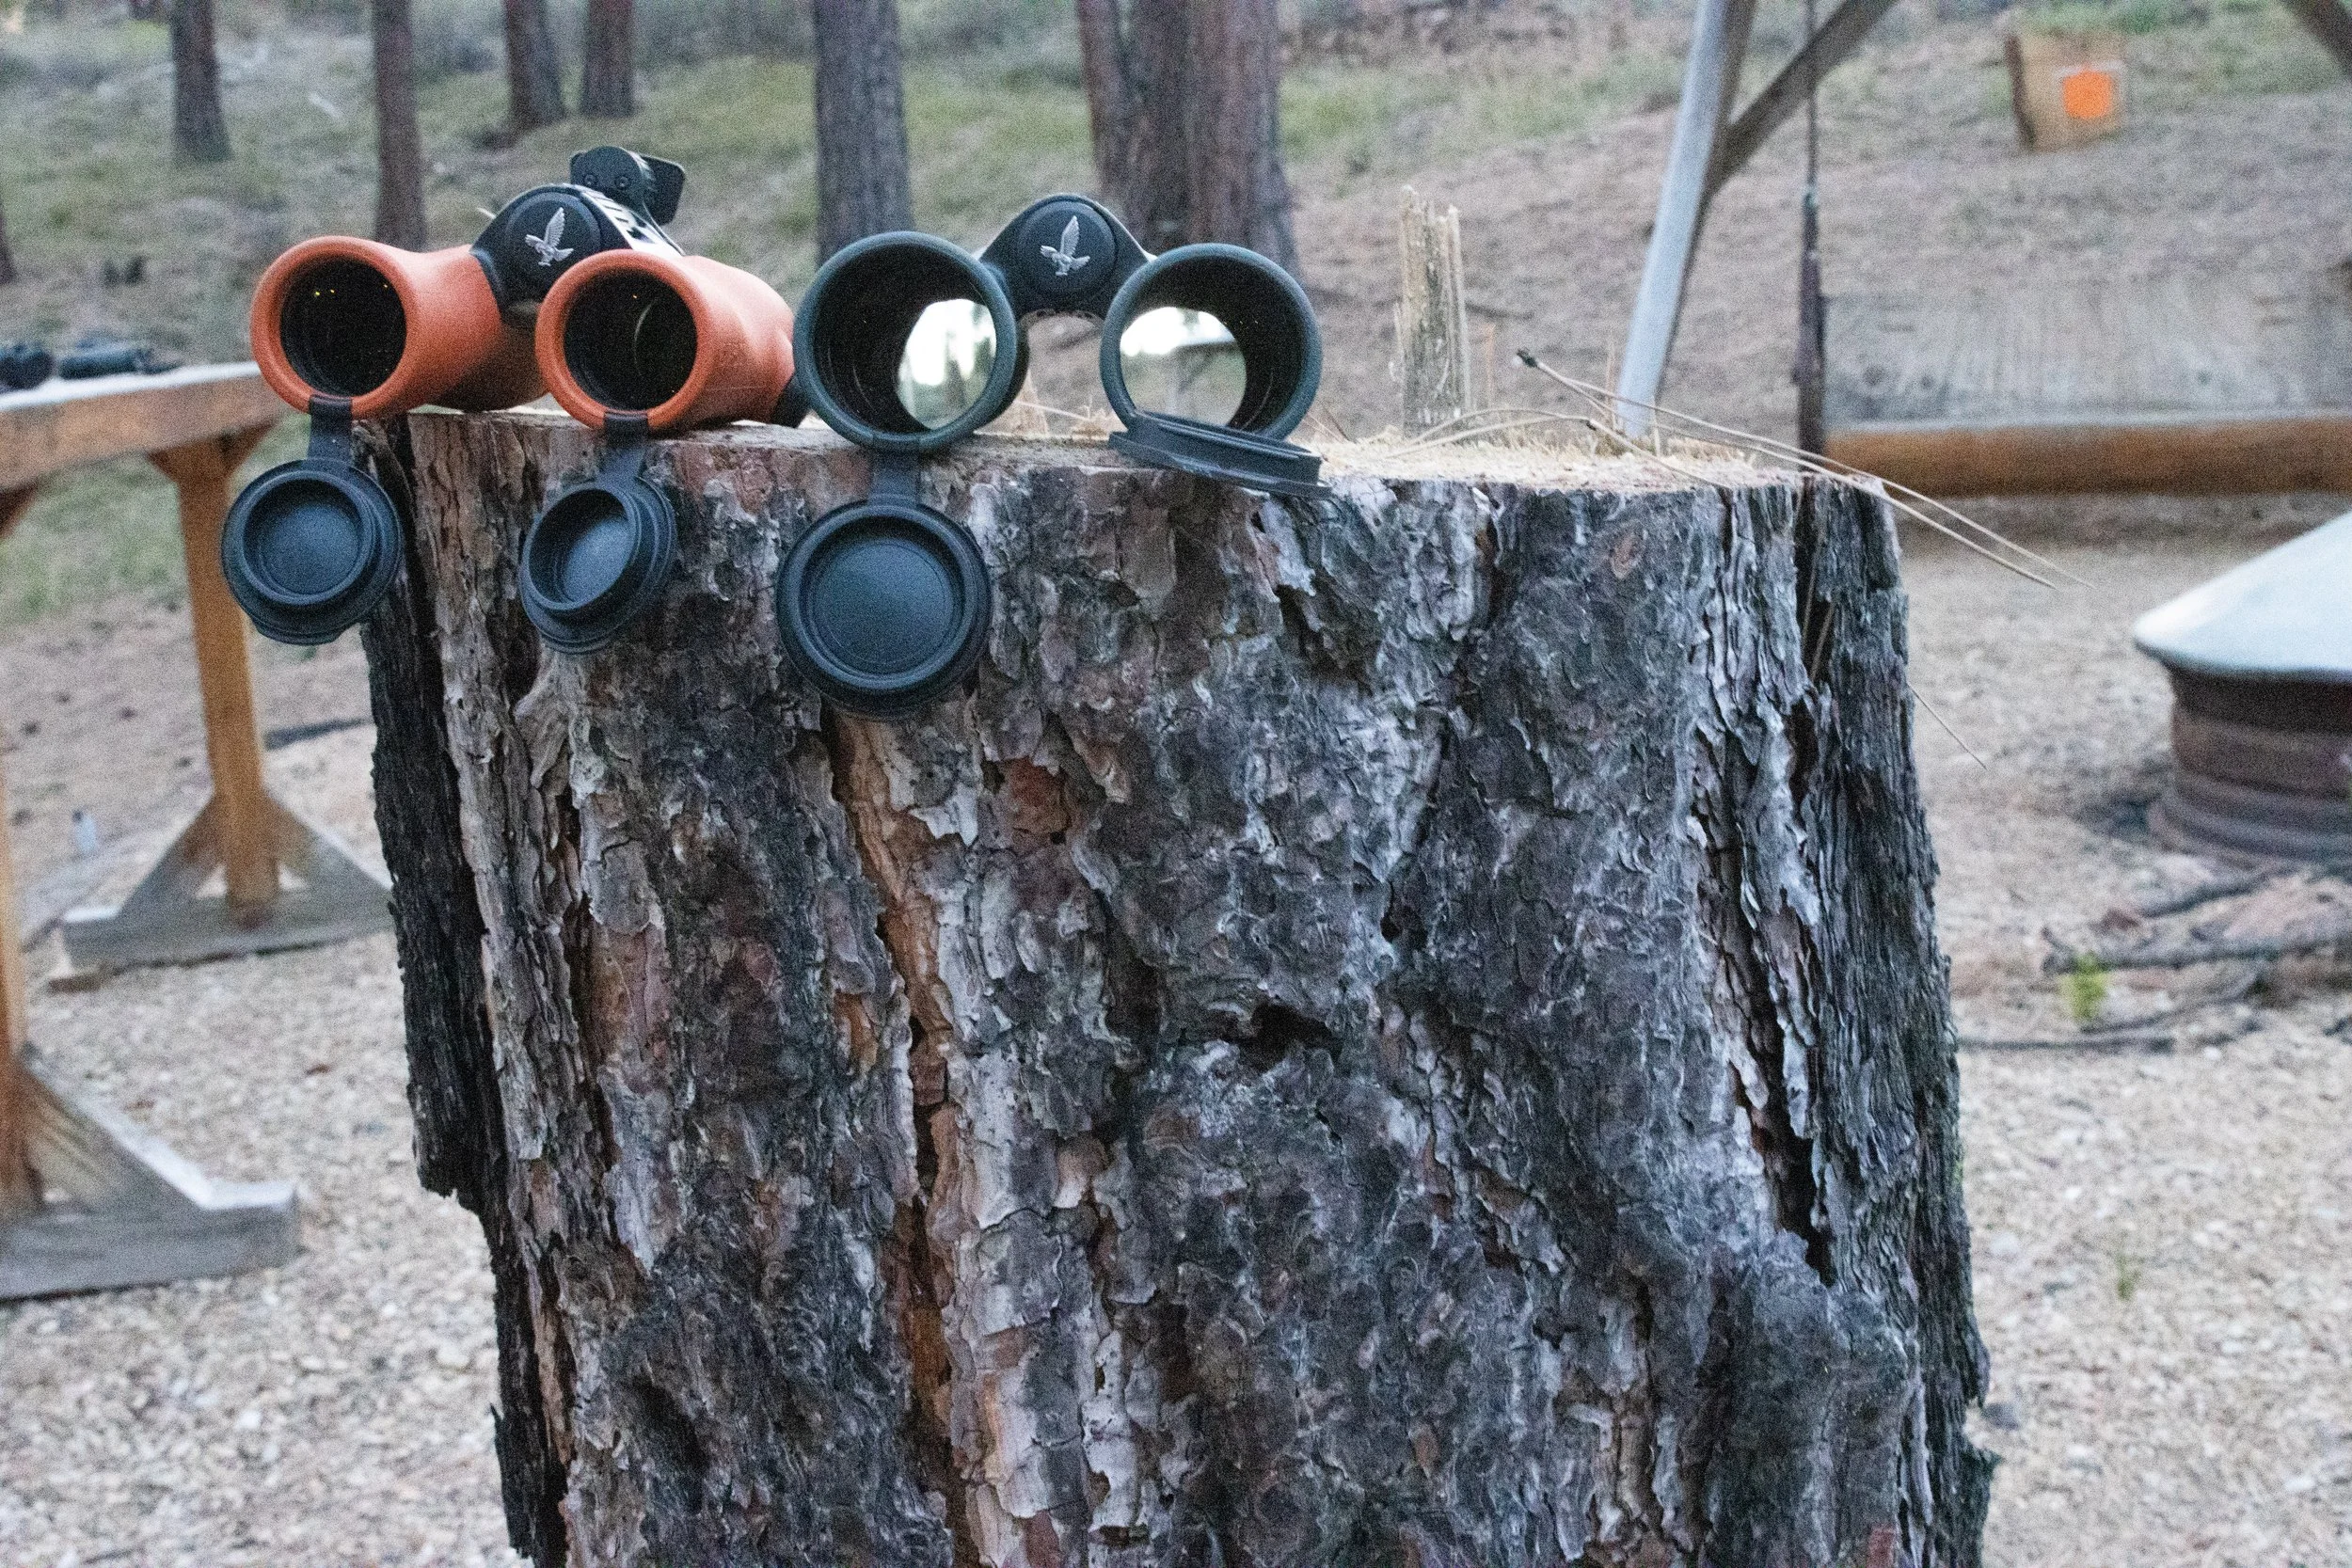
If you like what I have written thus far you can sign up for my mailing list to receive weekly updates and articles. Also, you can follow me on most social media platforms (@ignitedbynature) to include: TikTok, YouTube, Instagram and Facebook.
Written by Christopher Bunce 9/14/2023

The Modern Precision Rifle: A Full Review
A start to finish look at modern perfection.

I have always been a traditional hunting rifle kind of guy and never really understood the need or hype around the new folding chassis rifles. “If it isn’t broke don’t fix it,” is what my granddad used to say, and that is the kind of philosophy I have tried to live by throughout my life.
However, when my buddy showed up to the range with his shiny new Christensen Arms MPR rifle, I was more than intrigued. The hunting rifle had some cool features including: a metallic chassis that folded, a carbon fiber wrapped barrel, sub 10 pounds with a scope, and chambered in 6.5 PRC. The rifle was an absolute beauty and the groups it produced at the range that day were just as good as the rifle looked.
We spent the day at the range zeroing our rifles and plinking steel. After watching my buddy shoot sub MOA out to 200 yards I knew that I had to get one of these beauties for myself.

The MPR comes in a variety of different short and long action chamberings and retails at $2399 before tax. I was extremely intrigued with the 6.5 PRC cartridge, but in the end, I purchased a rifle chambered in 6.5 Creedmoor; mostly due to the fact that I could get more barrel life out of the cartridge and also because ammo and reloading supplies were readily available for this cartridge during the “Covid-19 Epidemic.”
I purchased the black nitride 6.5 Creedmoor model from Cabela’s. The rifle that I bought has a 22-inch barrel, is 34 inches when folded, and has a 1:8 twist. Check out my full overview on my YouTube channel (@ignitedbynature) in the link below:

CA 6.5 CREEDMOOR WITH 22 INCH BARREL
Unboxing the rifle was a dream, the packaging was sleek and elegant. Ergonomically the rifle is well put together and realitively lightweight. Beyond the folding stock one will find a contoured Christensen Arms carbon fiber barrel, carbon fiber comb, free-floating carbon fiber handguard, and a 20 MOA rail. The action and stainless-steel side-baffle muzzle brake is finished in Black Nitride to give the forfend of the rifle a sleek look, and yes, the muzzle break is removable.
The Modern Precision Rifle weighs in starting at 6.9 pounds before accessories and is backed by the Christensen Arms Sub-MOA Guarantee, a guarantee that they proudly stand by. Keep in mind that the weight will depend on the type of action, caliber and barrel length that you choose.
The barrel is made from 416R stainless steel. 416R steel is a pre-hardened chromium stainless steel which is suitable for use in precision match-grade rifle barrels. It can be supplied in various hardness ranges according to the specific requirements called for by the manufacturer. The steel is precision drilled, button rifled, and then turned down to a slim profile before being wrapped in a proprietary carbon fiber composite and then hand lapped. This creates a barrel that performs at or above the standards associated with a traditional barrel, without the weight associated with steel. The barrels are manufactured in Gunnison, Utah so you can rest easily knowing that your rifle was manufactured in the US. The threaded muzzle break is threaded with 5/8 x 24 (standard) threads and if you happen to buy the rifle in .223 the barrel will be threaded in 1/2 x 28 threads.

Moving down the rifle, you will find that the action is built of the tried-and-true Remington® 700 action and is compatible with 700 action optic bases. The action is also equipped with a Trigger Tech® “Flat” trigger. The trigger can be adjusted from 1.5 to 4 pounds. And from the factory my trigger broke at around 2 pounds. A 20 MOA Picatinny rail is included and the action has a tactical mag release and is AICS-Compatible.

The bolt on the MPR is a twin lug, spiral fluted bolt treated in nitride and is equipped with an oversized fluted bolt handle and an oversized fluted bolt knob making the bolt easy to grip and the overall function buttery smooth. The m16 style extractor helps the rounds eject flawlessly, Magnum calibers will have a dual ejector.

Now let’s move on to the Chassis, the chassis is built out of 7075 Billet aluminum and comes in three different colors (Black hard coat, Desert Brown, and Tungsten). 7075 aluminum alloy (AA7075) is an aluminum alloy with zinc being the primary alloying element. It has excellent mechanical properties and exhibits good ductility, high strength, toughness, and good resistance to fatigue and is corrosion resistant. It is one of the most commonly used aluminum alloys for highly stressed structural applications and has been extensively used in aircraft structural parts. Given Christensen Arms’ aeronautical engineering past, it makes sense why they chose to use this material on their weapon builds. Depending on the model, the Carbon fiber handguard is 14” or 17” and is equipped with M-lok capabilities which makes the rifle ideal for adding extra gadgets and gizmos.

Both the length of pull and cheek risers are adjustable via two set screws. The cheek riser is adjustable by 1” and the length of pull can be adjusted from 12.5” to 14.5”. The folding stock has a locking magnetic hinge (Magnelock™ Technology) and this ensures that your rifle does not unfold on you while it is in transport on the back of your pack or in your case.

The grip on the chassis is compatible with standard AR grips and has a V-block bedding and 6 Q/D flush cup Mounts; quick detach sling mounts (QD), also called flush cup sling mounts, are a type of mounting point used for attaching slings. "QD sling swivel" usually refers to the part attached to the sling, while "flush cup" refers to the corresponding socket on the firearm.

Lastly the chassis is equipped with a Picatinny rail on the underside giving one the ability to add a bipod or monopod quickly and easily. All in all, you are getting a semi-custom rifle out of the box that is ready to throw on your pack and accompany you on your next outdoor adventure.

Now before shooting your rifle, you will want to follow the break in procedures found on the Christensen Arms website. I have also provided a link to my YouTube video that demonstrates the break in process.
Basically, you will need about 50 to 60 rounds of ammo to complete this break in process. You will clean the factory oil out of your barrel initially, then fire two 3 round groups, clean, and repeat this process until you have fired 50 to 60 rounds. The break-in process ensures that you properly smooth or burnish the bore and groove of your barrel. Overall, this creates better consistency of the bullets traveling through the barrel and helps solidify the CA arms sub MOA guarantee. Once you have completed this process you can begin to have fun and really test out your MPR’s capabilities. In fact, I found that after 60 rounds my rifle was zeroed and I was shooting sub MOA groups out to 200 yards which was very impressive for an out-of -the-box-factory rifle.
For my initial setup I chose Leupold 30mm backcountry rings, a Leopold VX6-HD 3-18X42 illuminated BDC reticle scope and a picatinny mounted Valhalla Spartan bipod for a total weight of 9.24 pounds.

This rifle shoots like an absolute gem with factory load 143 gr ELD-Xs and 153 gr Berger bullets. I am shooting steel at 500 yards with no problem. I also love the folding chassis. When folded the 22 inch barreled 6.5 rifle fits nicely on the pack with an overall length of 34 inches. This allows you to sit on stumps or rocks without smacking the bottom of your rifle as you sit, a feature that is really convenient while backpack hunting. The rifle’s compact size made it easy to carry around and centered nicely on my K3 Exo pack. In fact, I was even able to take the rifle on a backpacking deer hunt last year and harvested a small buck!

Overall, I think Christensen Arms has done a great job creating a package that can perform out on the range and in the backcountry. The rifle is relatively light weight and is a tac driver when it comes to accuracy. You definitely get the sub MOA quality when you purchase one of these rifles.
Pros and Cons:
Pro:
semi-custom rifle with long range capabilities
Fairley light weight for a factory chassis rifle
Comes in a variety of different barrel lengths, calibers and colors
Great customer service.
Remington@ 700 action and easy to customize
Cons:
Expensive if you are on a budget
Does not have built in arca rails like XLR and MDT do for their hunting chassis
The Chassis is metal so it can get cold if you are carrying it through the woods in November.
Written By: Christopher Bunce 9/3/2023